Blog

  • Free Scientific Calculator Online: No Download Needed

    Free Scientific Calculator Online: No Download Needed

    Need to stop searching for a way to solve trig homework without a $100 calculator sitting in a drawer somewhere. That problem drives most searches for a free scientific calculator online, and the fix is simpler than it sounds. A scientific calculator handles sine, cosine, logarithms, exponents, and other functions that go past basic math, and a web-based version puts all of that in a browser tab, free, with no download and no account. This guide walks through what makes a good one, who actually benefits from using one, how a tool like the free scientific calculator at Tools Repository fits into that picture, and how web tools stack up against mobile apps. By the end, picking the right calculator for homework, code checks, or budget math should feel obvious.

    Key takeaways

    • Free online scientific calculators handle trig, logarithms, exponents, and memory functions the moment a page loads, no waiting required.
    • There’s nothing to install, nothing to pay, and no account to create, so the tool works the same on a laptop, tablet, or phone.
    • Tools Repository includes a free, privacy-first scientific calculator inside a library of 100+ other browser-based utilities.
    • Browser tools win for speed and quick tasks, while mobile apps tend to offer offline access and step-by-step tutorials instead.
    • Always confirm exam rules before trusting an online calculator for a test, since many testing centers only allow approved physical devices.

    Table of Contents

    What is a scientific calculator and why use one online?

    A scientific calculator is a tool built to solve math problems that go well past adding and subtracting, covering trigonometry, logarithms, exponents, roots, and statistics. Unlike a basic four-function calculator, it can find the sine of an angle, calculate a natural logarithm, or raise a number to a fractional power, all functions that show up constantly in physics, chemistry, and engineering coursework. Physical models from Texas Instruments, Casio, and Sharp have sat in classrooms for decades, but they still cost money and can be lost, cracked, or left at home on exam day.

    Using one online removes those problems in one move. A browser-based version costs nothing, loads on any device with internet access, and updates automatically instead of needing a firmware patch or a new device every few years. That combination of zero cost and instant access is exactly why students, developers, and freelancers increasingly reach for a browser tab instead of a physical device drawer.

    What features should a free online scientific calculator have?
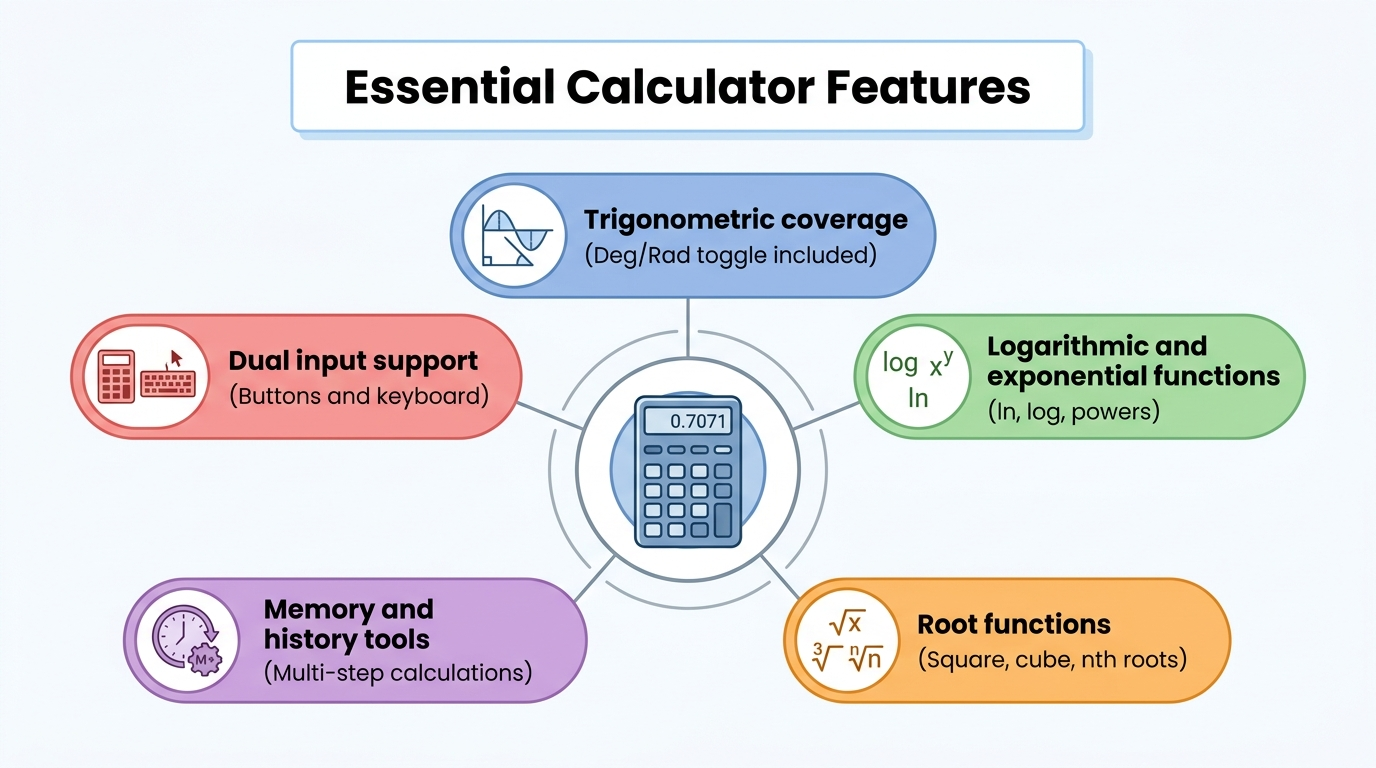
    Infographic of essential scientific calculator features

    A capable free online scientific calculator should cover trigonometry, logarithms, exponents, roots, memory storage, and built-in constants, all inside one clean interface. These categories aren’t optional extras, they’re the baseline that separates a genuine scientific tool from a glorified basic calculator. Trig functions like sine, cosine, and tangent (plus their inverses) need a Degree/Radian toggle to stay accurate across geometry, physics, and engineering problems. Logarithmic functions, both natural log (ln) and base-10 log (log), matter for anything involving growth or decay, from compound interest to pH values in chemistry. Powers and roots, including square root, cube root, and generalized nth-root functions, round out the math side, while constants like pi and Euler’s number save time by removing manual entry, a general input approach also outlined in the CCalc technical reference for parsing mathematical expressions.

    Beyond the math itself, input flexibility matters just as much as the function list. A calculator that only accepts mouse clicks slows down anyone comfortable typing numbers on a keyboard, while a tool that supports both methods serves beginners and power users equally well. Here’s what to look for when comparing options:

    • Trigonometric coverage with a working Deg/Rad toggle, since mixing up angle units is one of the most common calculation mistakes.
    • Logarithmic and exponential functions covering ln, log, and powers like x^y, e^x, and 10^x for scientific and financial math.
    • Root functions for square root, cube root, and custom nth roots, useful across physics and geometry problems.
    • Memory and history tools that store values for multi-step work without forcing manual re-entry.
    • Dual input support, meaning both clickable buttons and direct keyboard typing work equally well.

    Trigonometric, logarithmic, and exponential functions

    These three function families cover most of what a scientific calculator gets used for outside basic arithmetic. Sine, cosine, and tangent (along with their inverse forms, sin⁻¹, cos⁻¹, and tan⁻¹) solve triangle and angle problems, and a Deg/Rad toggle keeps results aligned with whatever unit a textbook or lab manual expects. Logarithms, both natural log and base-10 log, along with exponential functions like e^x and 10^x, handle growth, decay, and scientific notation problems that show up across chemistry, finance, and computer science.

    Memory and utility functions

    Memory and utility buttons turn a calculator from a single-answer tool into something that can handle multi-step problems smoothly. M+ and M- store and adjust a saved value, MR recalls it, and Ans pulls the last result forward so long decimals never need retyping, a memory workflow explained in detail in the KCalc handbook for desktop scientific calculators. Parentheses support, along with percentage and factorial buttons, rounds out the toolkit for anyone working through layered equations or probability problems.

    How does Tools Repository’s free scientific calculator work?
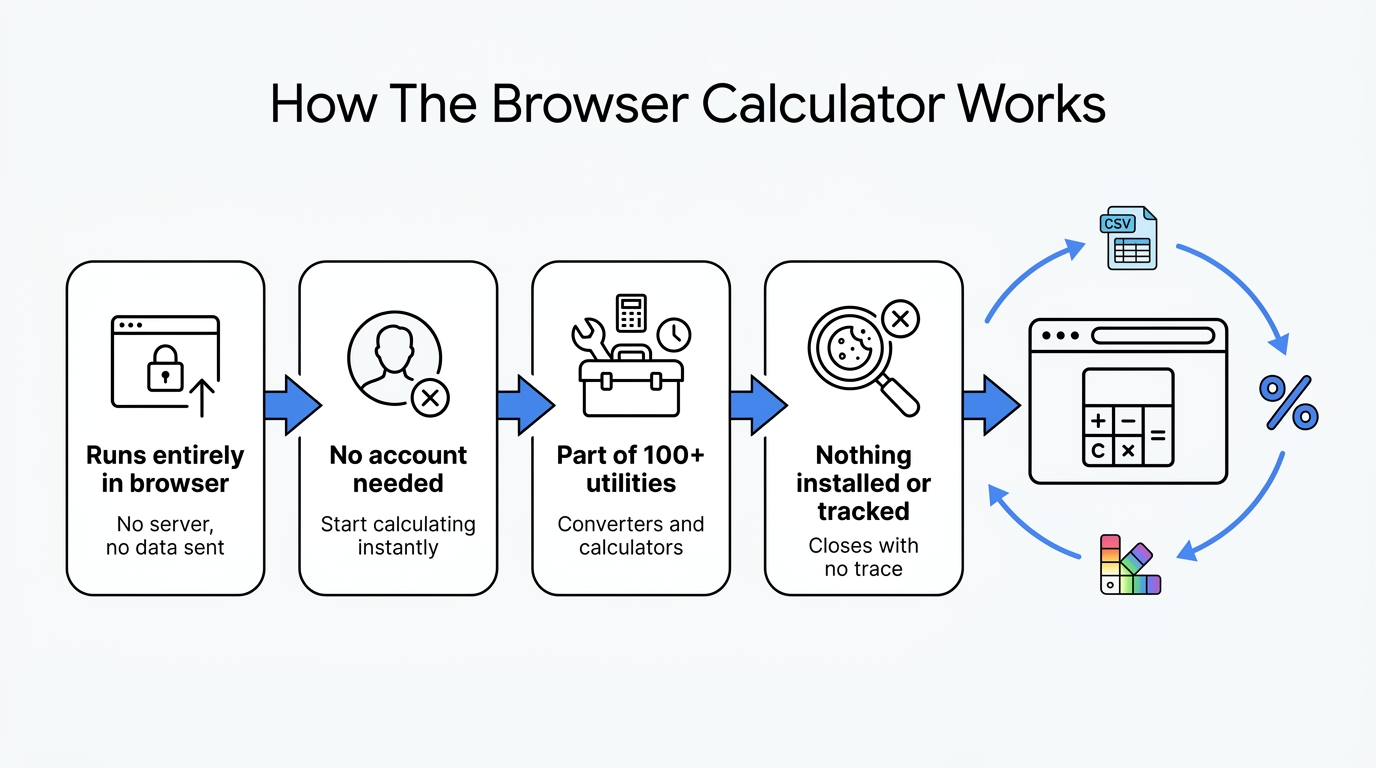
    Diagram of how the online scientific calculator tool works

    Tools Repository’s free scientific calculator runs entirely inside the browser, meaning calculations happen locally with no data sent to a server and no account needed to start. It’s one of more than 100 free utilities on the platform, sitting alongside data converters, unit converters, and other calculators built for developers, students, and freelancers who want quick answers without switching between a dozen different single-purpose sites. Because nothing gets installed and nothing gets tracked, the tool loads fast and closes the tab just as easily, leaving no trace behind.

    This fits naturally into a broader workflow where someone might convert a CSV file, check a color contrast ratio, and run a trigonometric calculation in the same short browsing session. Rather than bouncing between ad-heavy calculator sites, the platform keeps the scientific calculator inside a clean, ad-light hub built for speed. That consolidation matters most for people who use several small tools daily and don’t want to manage bookmarks for each one separately.

    Who benefits most from a free online scientific calculator?
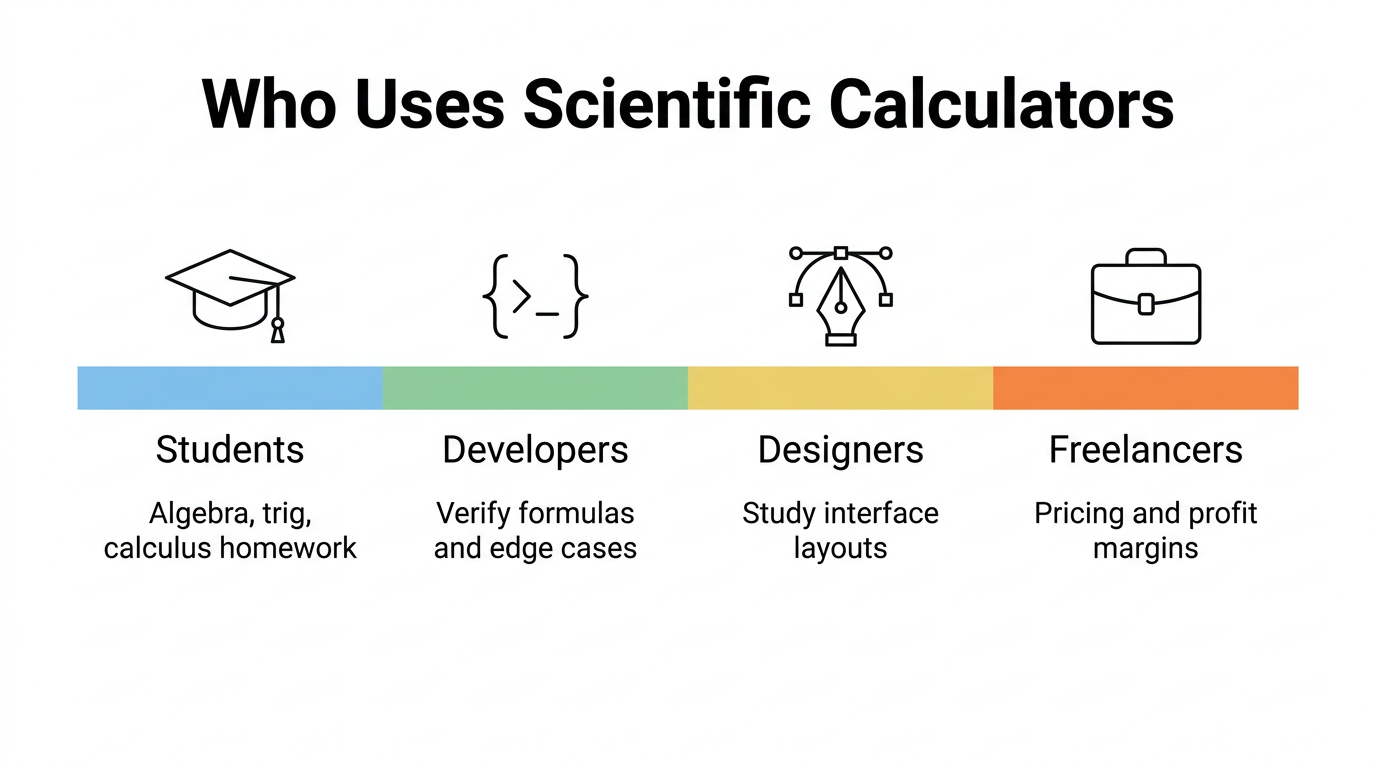
    Infographic of user groups who use scientific calculators

    Students, developers, designers, writers, and freelancers all lean on a free online scientific calculator for different reasons, but the common thread is needing accurate math fast without extra cost or setup. Someone finishing a physics problem set needs the same instant trig access that a freelancer calculating a markup percentage does, just applied to different numbers. Because these tools work identically across devices, a student on a school laptop and a freelancer on a phone between meetings both get the same reliable function set. That shared reliability is part of why free scientific calculators have become a default reference tool across so many different work and study routines.

    Students and academic users

    Students use scientific calculators constantly for algebra, trigonometry, and calculus homework, plus quick verification before submitting an assignment. Standardized tests like the SAT and ACT often have specific calculator policies, so students should confirm with an instructor or test proctor whether an online tool is allowed before relying on it for exam day.

    Developers, designers, writers, and freelancers

    Developers use these calculators to verify formulas or test numeric edge cases without leaving the browser mid-project. Designers study calculator interfaces for lessons on button hierarchy and layout density, writers double-check statistics before publishing, and freelancers run quick percentage math for pricing, discounts, or profit margins.

    Web-based calculators vs. mobile apps: which should you use?
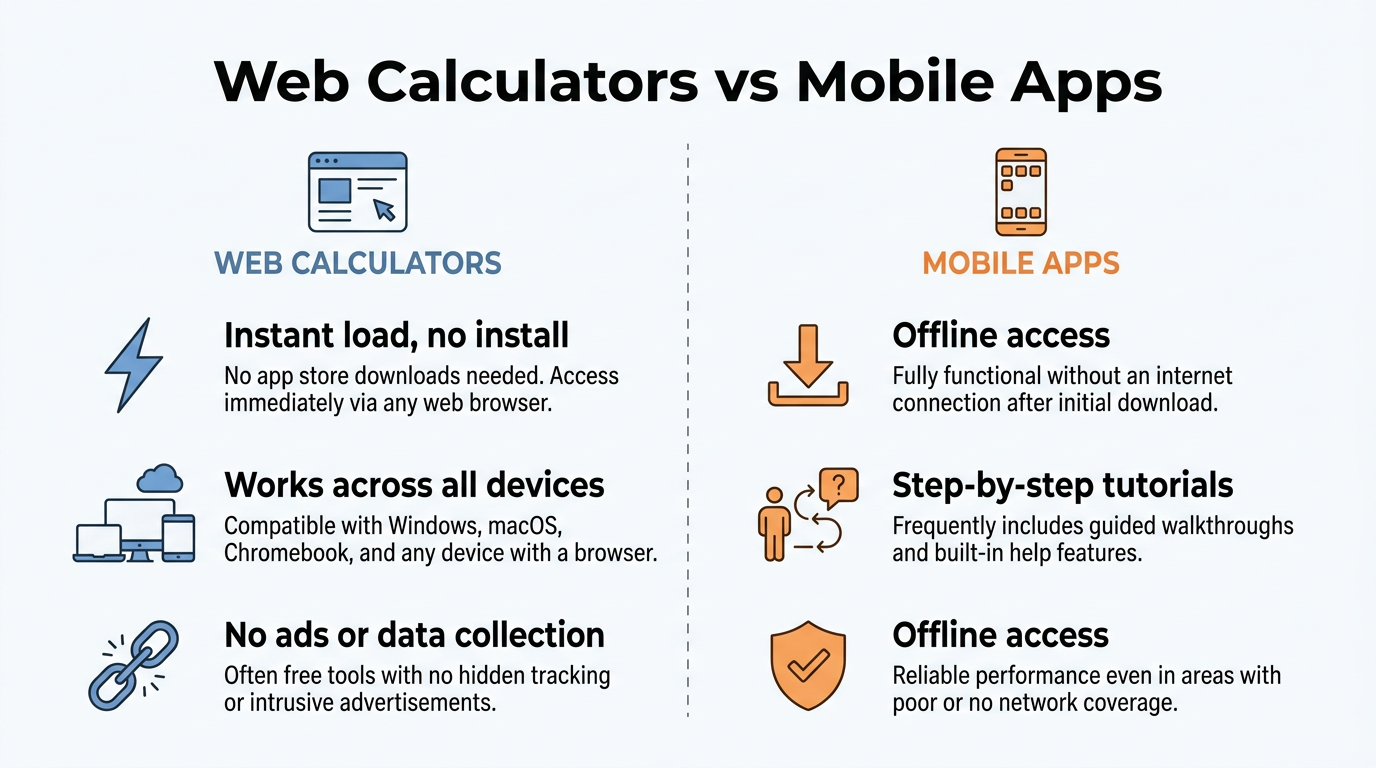
    Comparison chart of web calculators versus mobile apps

    Choosing between a web-based scientific calculator and a mobile app comes down to whether speed or offline depth matters more for a given task. Browser tools load instantly with zero installation, work the same across Windows, macOS, and Chromebooks, and disappear the moment the tab closes, which makes them ideal for quick, one-off calculations during homework or a workday. Mobile apps, on the other hand, often add step-by-step solution walkthroughs, formula libraries, and offline access once downloaded, features that suit deeper study sessions away from Wi-Fi.

    That extra functionality in apps usually comes with trade-offs worth knowing about:

    • Many free apps rely on ads or in-app purchases to stay profitable.
    • Some collect personal data or usage activity, disclosed through app store privacy labels.
    • Browser-based tools like the one on Tools Repository skip that entirely since no account or download is involved, which makes them the more privacy-friendly pick for anyone who just needs a fast answer and nothing more.

    How do I choose the right free scientific calculator online?

    Student using free online scientific calculator on laptop

    Picking the right free scientific calculator online starts with matching the tool’s interface and input options to how a person actually works. Someone who grew up using a physical handheld calculator might prefer a layout that mirrors that button grid, while someone comfortable typing math notation directly will value strong keyboard support more than visual familiarity. Beyond that, it helps to think about whether extra features like graphing, formula libraries, or step-by-step explanations actually matter for the task at hand, since a simpler tool often loads faster and feels less cluttered for basic scientific work.

    Privacy and compliance deserve equal weight in that decision, especially for students prepping for standardized tests. A tool that skips account creation and keeps calculations on-device avoids the data questions that come with login-based platforms, and for exam prep specifically, it’s worth confirming whether a testing center recognizes a particular calculator as an approved option before building study habits around it.

    Tip: Before relying on any online calculator for a graded test, check the exam’s official device policy first. It takes two minutes and saves the panic of finding out mid-exam that a browser tab isn’t allowed.

    The takeaway

    Free online scientific calculators solve a real problem, cutting the cost, clutter, and waiting that come with dedicated hardware or app downloads. Whether the task is a trigonometry problem set, a quick logarithm check during coding work, or a percentage calculation for a client invoice, a browser-based tool delivers the same math a $100 handheld device would, instantly and without commitment.

    Tools Repository’s free scientific calculator fits into that picture as one part of a much larger toolkit, sitting alongside converters, generators, and formatters that cover a wide range of everyday digital tasks. Since it requires no login and processes everything locally, it’s a practical, privacy-respecting option worth bookmarking for anyone who needs quick, reliable math without the extra weight of an account or an app.

    Frequently asked questions

    Question: Is a free online scientific calculator as accurate as a physical one?
    Yes, accuracy is equivalent since both rely on the same mathematical logic and formulas. The main practical difference is that browser-based tools update automatically to fix bugs or add functions, while physical calculators stay fixed once purchased.

    Question: Can I use an online scientific calculator during an exam?
    That depends entirely on the institution or testing organization’s specific rules. Some allow approved online tools like Desmos, while others require a certified physical device, so it’s best to confirm with an instructor or proctor beforehand.

    Question: Do free online scientific calculators work without an internet connection?
    Most web-based scientific calculators need an active internet connection to load and function properly. This differs from downloaded mobile apps or physical calculators, which typically work offline once installed or purchased.

    Question: Does a free scientific calculator online require sign-up or personal data?
    Quality tools, including the one on Tools Repository, require no login and keep every calculation on the user’s device. That means no personal data collection and no account creation needed to start calculating right away.

    Question: What’s the difference between a scientific calculator and a graphing calculator?
    A scientific calculator handles numeric functions like trigonometry, logarithms, and exponents without visual output. A graphing calculator builds on that by plotting equations visually, letting users see how variables relate across a coordinate plane.

    Question: Can I switch between degrees and radians easily online?
    Yes, most free online scientific calculators include a simple Deg/Rad toggle button near the main function keys. Getting this setting right matters since mixing up degrees and radians is one of the most common trigonometry calculation errors.

  • How to Calculate Annual Salary: Formula & Examples

    How to Calculate Annual Salary: Formula & Examples

    Figuring out your true yearly income sounds simple until you actually try to do it. A paycheck stub shows an hourly rate or a bi-weekly deposit, but neither one tells you the full picture you need for budgeting, loan applications, or comparing two job offers side by side. That gap between what you get paid and what you actually earn each year causes real confusion, especially when raises, bonuses, or vacation days get added into the mix.

    Knowing how to calculate annual salary clears up that confusion fast. Annual salary is simply your total gross pay for one calendar year, and you get there by multiplying your pay rate by the number of pay periods in a year. This article walks through that basic formula, shows you how to adjust it for holidays and vacation time, explains how to convert between weekly, bi-weekly, and monthly pay, and covers how to estimate what actually lands in your bank account after taxes.

    By the end, you’ll be able to work out your own numbers with confidence, whether you’re paid hourly, salaried, or somewhere in between. Let’s start with the formula everyone from payroll clerks to HR software relies on.

    Key takeaways

    • The core formula is gross pay per period multiplied by the number of pay periods in a year, whether you’re paid hourly, weekly, or monthly.

    • Unadjusted salary assumes you work all 260 days a year, while adjusted salary subtracts paid holidays and vacation days for a more honest number.

    • Weekly, bi-weekly, semi-monthly, and monthly paychecks all trace back to the same annual figure, just divided differently.

    • Gross salary is not take-home pay. Federal tax, FICA, and state withholding typically remove 15% to 25% before the money reaches you.

    • A free browser-based calculator, like the one on Tools Repository, can run every version of this math instantly without asking for your personal pay details.

    Table of Contents

    What is the basic formula for calculating annual salary?

    Infographic showing basic annual salary formula steps

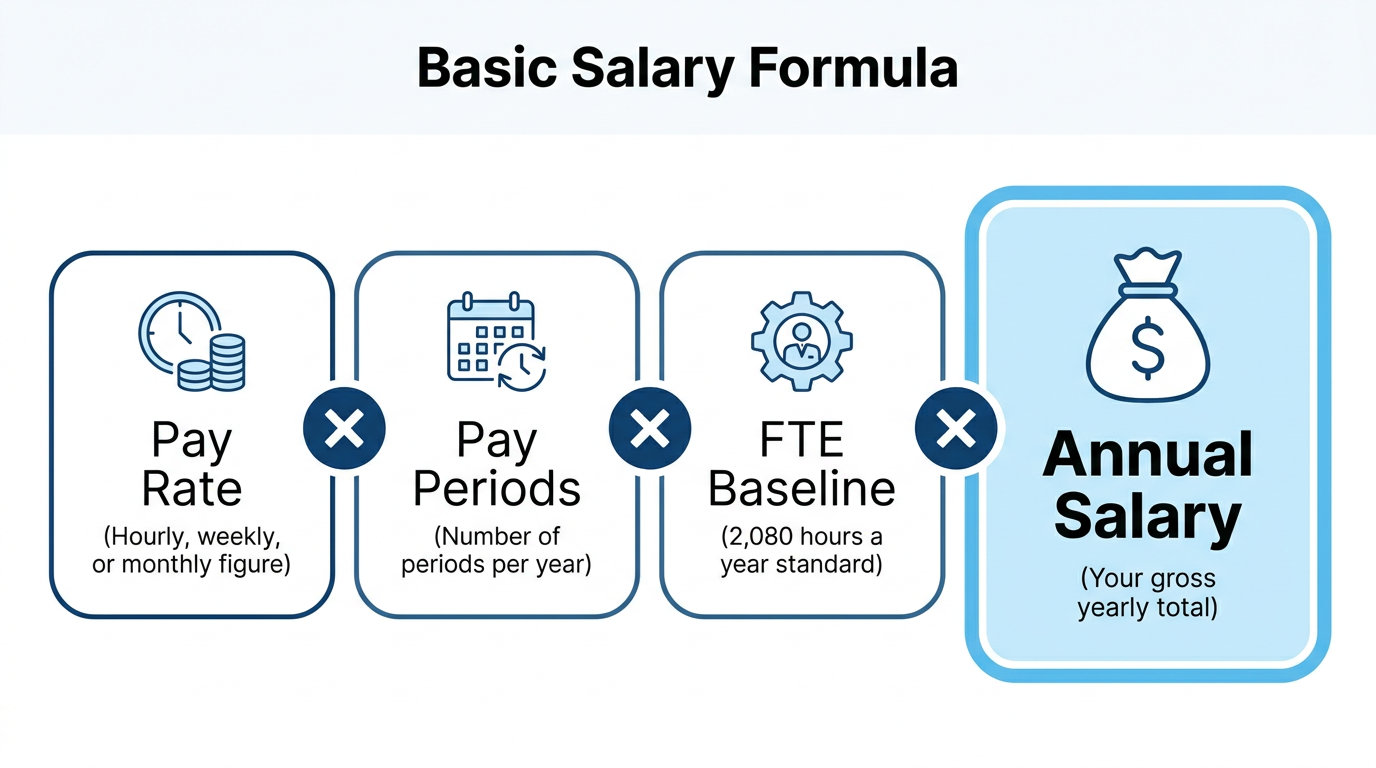
    The basic formula for calculating annual salary is your gross pay per period multiplied by the number of pay periods in a year, and this single equation covers almost every pay type you’ll run into. If you’re paid hourly, that means hourly rate times hours worked per week times 52 weeks. If you’re on a weekly paycheck, it’s weekly pay times 52. Monthly earners multiply their monthly figure by 12. This math rests on a standard baseline most employers and payroll systems use, called a Full-Time Equivalent, or FTE, which is 40 hours a week for 52 weeks, adding up to 2,080 working hours a year. That baseline matters because every salary calculator, HR spreadsheet, and offer letter builds from it before anyone thinks about holidays, overtime, or part-time schedules. Once you know your pay rate and your typical hours, you have everything you need to work out a rough annual number in under a minute, and that number becomes your reference point for every other calculation in this guide, from comparing job offers to estimating your real take-home pay.

    Examples for hourly, weekly, and monthly pay

    Seeing the formula applied to real numbers makes it much easier to plug in your own figures later. Someone earning $25 an hour on a standard 40-hour week lands at $25 times 40 hours times 52 weeks, which comes to $52,000 a year. A worker paid $1,500 weekly reaches $78,000 annually simply by multiplying that figure by 52 pay periods. Someone on a $4,000 monthly salary ends up at $48,000 a year after multiplying by 12 months.

    It’s worth noting that all three of these results are unadjusted figures. They assume you work every single scheduled day of the year without subtracting holidays or vacation time, which is the next piece of the puzzle worth understanding before you compare it to your own paycheck.

    How do you adjust annual salary for holidays and vacation days?

    Infographic on adjusting salary for vacation days

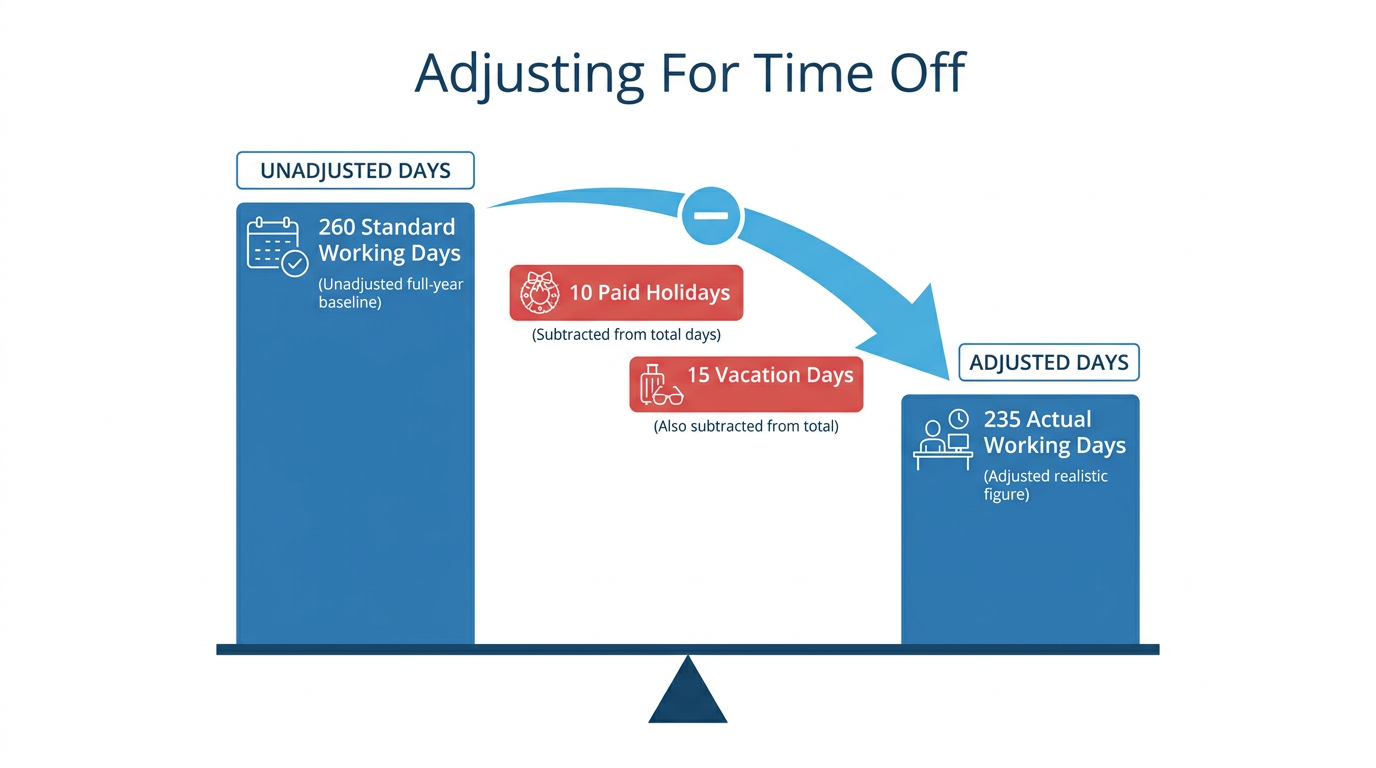
    Adjusting annual salary for holidays and vacation days means subtracting your paid non-working days from the standard 260 working days before multiplying by your daily or hourly rate. The unadjusted figure assumes you clock in every scheduled day of the year, which almost nobody actually does once holidays, sick days, and vacation are factored in. The adjusted version gives you a more honest picture because it recognizes that you’re paid the same total salary while working fewer real hours. This distinction matters more than most people realize, since paid time off does not actually shrink your paycheck. It raises your effective hourly rate instead, because you’re earning the same annual total for less time on the clock. Someone earning $50,000 a year with 20 paid days off still takes home the full $50,000, but they’re doing it in fewer working hours than a colleague with no vacation at all, which makes their real hourly value higher even though the salary line on paper looks identical.

    Worked example: subtracting non-working days

    A quick example makes this concrete using a $30 hourly rate, 8 hours a day, and the standard 260 working days a year.

    • Unadjusted salary: $30 x 8 x 260 = $62,400

    • Non-working days: 10 holidays + 15 vacation days = 25 days

    • Actual working days: 260 – 25 = 235

    • Adjusted salary: $30 x 8 x 235 = $56,400

    The same worker earns less in raw dollars on paper, but they’re working fewer days to get there, which is exactly the tradeoff worth understanding before comparing two offers with different time-off policies.

    How do you convert between pay periods?

    Infographic comparing weekly, biweekly, monthly pay periods

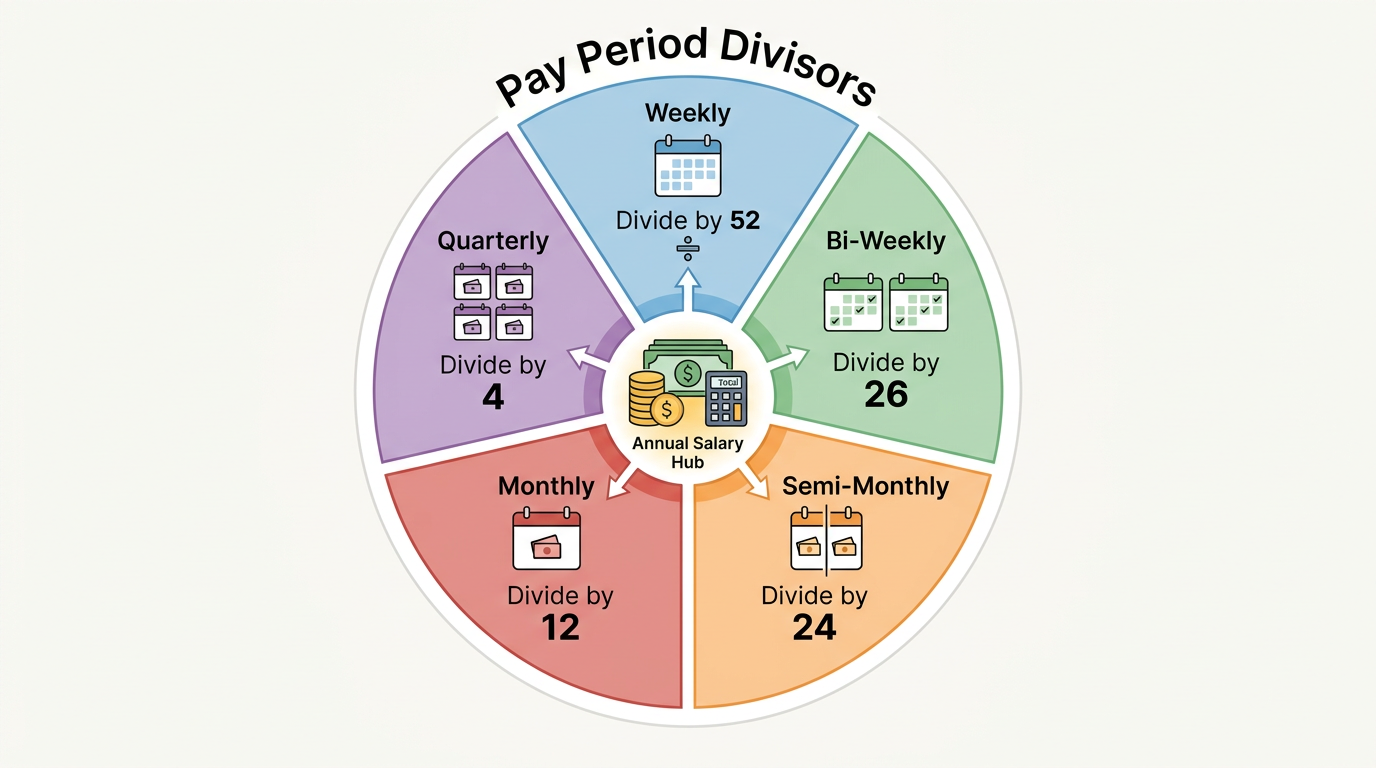
    Converting between pay periods means dividing your annual salary by the number of paychecks you receive in a year, and each frequency has its own standard divisor. A weekly paycheck divides the annual total by 52, bi-weekly divides by 26, semi-monthly divides by 24, and monthly divides by 12. These numbers look similar but they are not interchangeable, and mixing them up is one of the most common mistakes people make when budgeting around a new job.

    Pay periodDivide annual salary byPay periods per year
    Weekly5252
    Bi-weekly2626
    Semi-monthly2424
    Monthly1212
    Quarterly44

    Bi-weekly and semi-monthly get confused constantly because both sound like “twice a month.” Bi-weekly means every two weeks, which produces 26 paychecks a year and occasionally two paychecks in the same month. Semi-monthly means twice a month, usually on the 15th and the last day, producing 24 paychecks with dates that shift depending on how many days that month contains.

    How do you compare job offers with different pay structures?

    Infographic comparing monthly versus hourly job offers

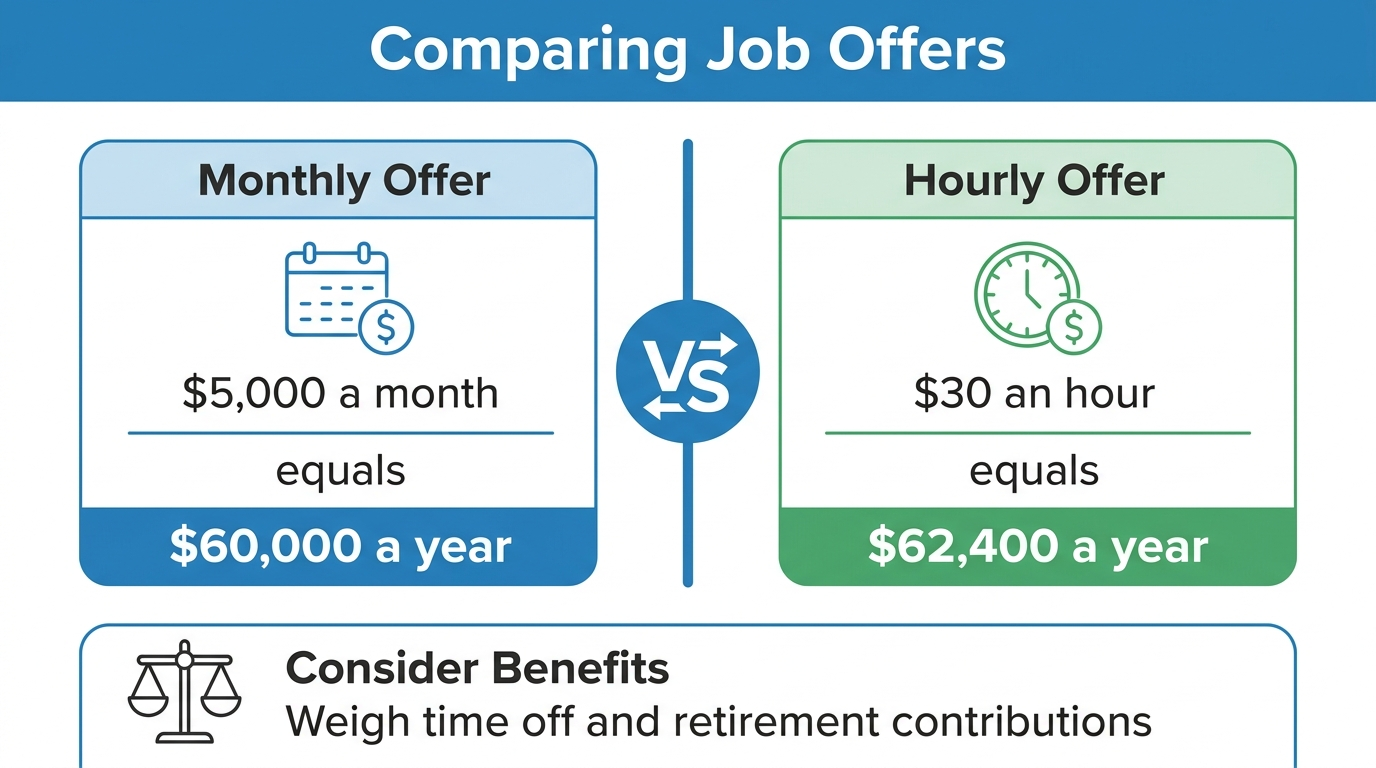
    Comparing job offers with different pay structures requires converting every offer into the same annual figure, since a monthly number and an hourly number aren’t naturally comparable side by side. Take a job paying $5,000 a month against one paying $30 an hour for a standard 40-hour week. The monthly offer works out to $5,000 times 12, or $60,000 a year. The hourly offer comes to $30 times 40 times 52, or $62,400 a year, which is $2,400 more despite looking smaller on paper at first glance.

    That gap shows exactly why converting everything to an annual figure before making a decision matters so much. Beyond the base number, it’s worth weighing paid time off, health benefits, and retirement contributions too, since a slightly lower salary with stronger benefits can outperform a higher number with a thin benefits package.

    How do you estimate take-home pay from your annual salary?

    Infographic showing gross salary minus tax deductions

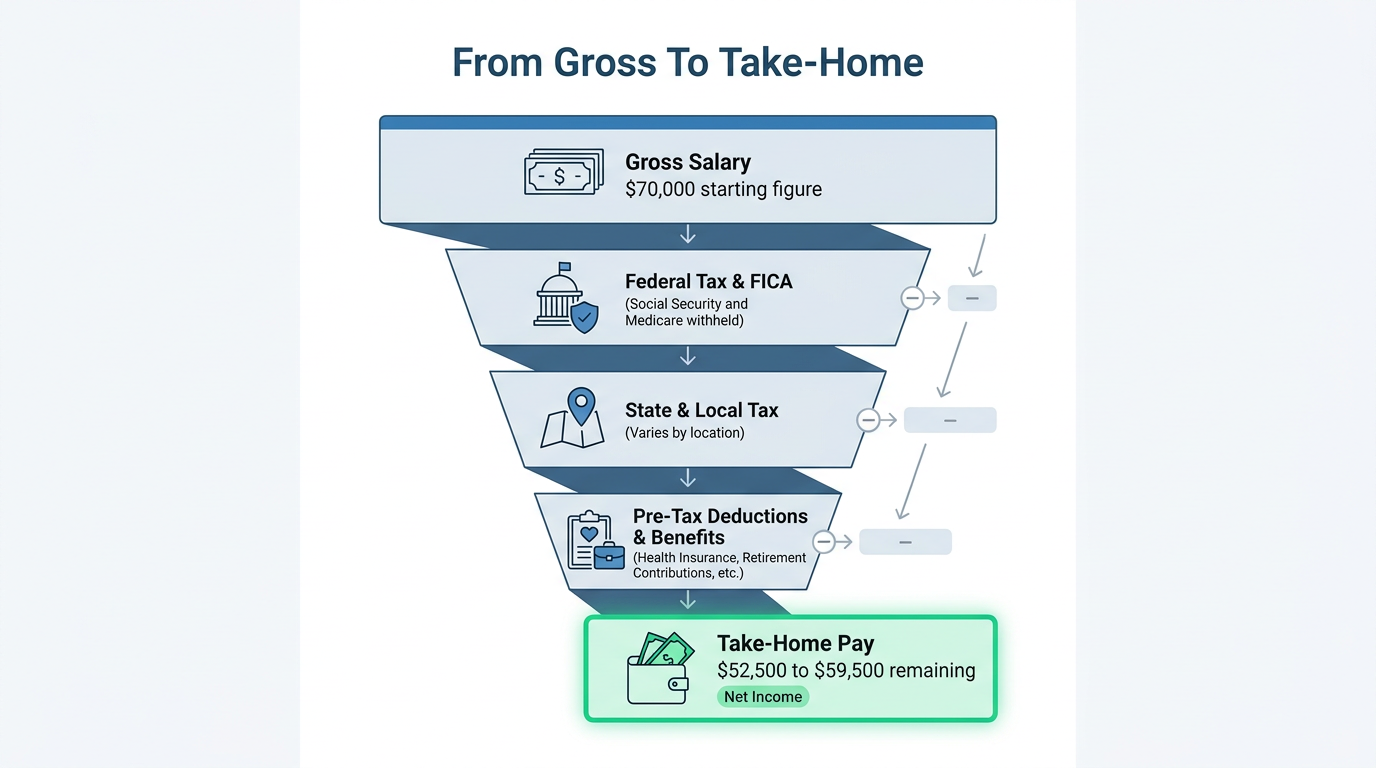
    Estimating take-home pay from your annual salary means subtracting federal tax, FICA, state and local tax, and any benefit contributions from your gross figure to see what actually lands in your account. FICA covers Social Security and Medicare, with employees paying 6.2% and 1.45% respectively, matched by the employer. Add in federal withholding based on your Form W-4, plus state and local taxes that vary by location, and you get a full deduction picture that no single number can capture perfectly, which is why most people rely on a rough percentage instead.

    A common rule of thumb puts total deductions somewhere between 15% and 25% of gross income, depending on your state and personal situation, which lines up with recent reporting on what percentage of taxes gets taken out of paychecks nationally.

    On a $70,000 gross salary, a 25% deduction rate leaves $52,500 in take-home pay, while a 15% rate leaves $59,500. That $7,000 spread shows just how much your specific tax situation can shift the final number, so treat these figures as a starting estimate rather than an exact paycheck prediction.

    Calculate your exact salary instantly with a free tool

    Running these formulas by hand works fine for a quick estimate, but a browser-based calculator handles every pay period conversion instantly without any manual multiplication or risk of a math slip. Tools Repository offers exactly this kind of tool, letting you enter an hourly, weekly, or monthly figure and see the full breakdown across every other pay frequency in seconds. Because everything runs locally in your browser, none of your income details ever get sent to a server or stored anywhere, which matters if you’d rather keep your pay details private while comparing offers or checking your own numbers.

    There’s no sign-up wall, no subscription, and no software to install before you can use it. That kind of straightforward access fits naturally into the workflow of freelancers checking their effective hourly rate, students budgeting a first job offer, or small business owners estimating payroll costs without opening a spreadsheet.

    The takeaway

    Working out an accurate yearly figure starts with one simple equation, pay rate multiplied by pay periods, but the honest number depends on a few more steps. Adjusting for holidays and vacation days shows your real effective rate, converting between pay periods clears up paycheck confusion, and estimating deductions gets you closer to what actually lands in your account. Each of these calculations builds on the last, so once you’re comfortable with the basic formula, the rest follows naturally.

    If you’d rather skip the manual arithmetic altogether, a free calculator from the platform can run every one of these conversions in seconds, right in your browser, without asking for a login or storing your data anywhere. Whether you’re negotiating a raise, comparing two offers, or just curious what your hourly grind adds up to over a year, the numbers are worth knowing precisely.

    Frequently asked questions

    Question: How many work hours are in a year?

    A standard full-time work year totals 2,080 hours, based on 40 hours a week across 52 weeks. This figure is known as the Full-Time Equivalent, or FTE, and it’s the baseline most payroll systems and salary calculators use before adjusting for overtime, part-time schedules, or unpaid time off.

    Question: What’s the difference between salary and wage?

    Salary is a fixed annual amount paid regardless of hours worked in a given week, while a wage is calculated by multiplying an hourly rate by actual hours worked. Wage earners are usually classified as non-exempt under the Fair Labor Standards Act, meaning they qualify for overtime pay, while salaried workers are often exempt.

    Question: How do I calculate my annual salary if I get paid bi-weekly?

    Multiply your bi-weekly paycheck amount by 26, since bi-weekly pay produces 26 pay periods in most years. For example, a $2,000 bi-weekly paycheck comes to $52,000 a year. This is different from semi-monthly pay, which only has 24 pay periods annually.

    Question: Does paid time off reduce my annual salary?

    No, paid time off does not reduce your annual salary at all. You still receive your full agreed salary while working fewer actual hours, which effectively raises your true hourly value even though the yearly dollar figure on your contract stays the same.

    Question: What’s considered a good annual salary in the US?

    Recent Bureau of Labor Statistics wage data puts average full-time earnings at roughly $63,128 a year, which offers a rough national benchmark. What counts as “good” really depends on your industry, location, and local cost of living, so compare against similar roles in your specific area.

    Question: How much of my salary goes to taxes?

    Total deductions, including federal income tax, FICA, and state tax, typically range from about 15% to 25% of gross income. The exact percentage depends on your state, filing status, and any pre-tax benefit contributions, so treat this range as a general planning estimate rather than an exact figure.

  • What Is a Simple Interest Formula? (I = Prt Explained)

    What Is a Simple Interest Formula? (I = Prt Explained)

    Trying to figure out how much interest a loan or savings account will really cost or earn can feel confusing, especially when every bank and calculator seems to use different numbers. Interest math doesn’t have to be complicated. So what is a simple interest formula? It’s a plain equation, written as I = Prt, that calculates interest based only on your original principal amount, with no compounding involved at all.

    Many people mix up simple interest with compound interest, or don’t know how to plug real numbers into the equation. That confusion can lead to bad assumptions about what a loan actually costs or what a deposit will actually earn over time.

    This guide breaks the simple interest formula down in plain language, then walks through real examples using loans and savings accounts. You’ll see how to rearrange the formula to solve for principal or time, how simple interest stacks up against compound interest, and where you’re likely to run into it in everyday finance. We’ll also show you how a free tool from Tools Repository can check your math in seconds.

    Key takeaways

    • The simple interest formula is I = P × r × t, where P is the principal, r is the annual rate, and t is time in years.

    • To find the full balance rather than just the interest, use A = P(1 + rt).

    • Simple interest grows in a straight line, unlike compound interest, which accelerates over time.

    • Auto loans, student loans, short-term personal loans, and many mortgages calculate interest this way.

    • You can rearrange the formula to solve for principal or time when planning a savings goal or loan payoff.

    Table of Contents

    What is the simple interest formula?

    Diagram breaking down the simple interest formula components

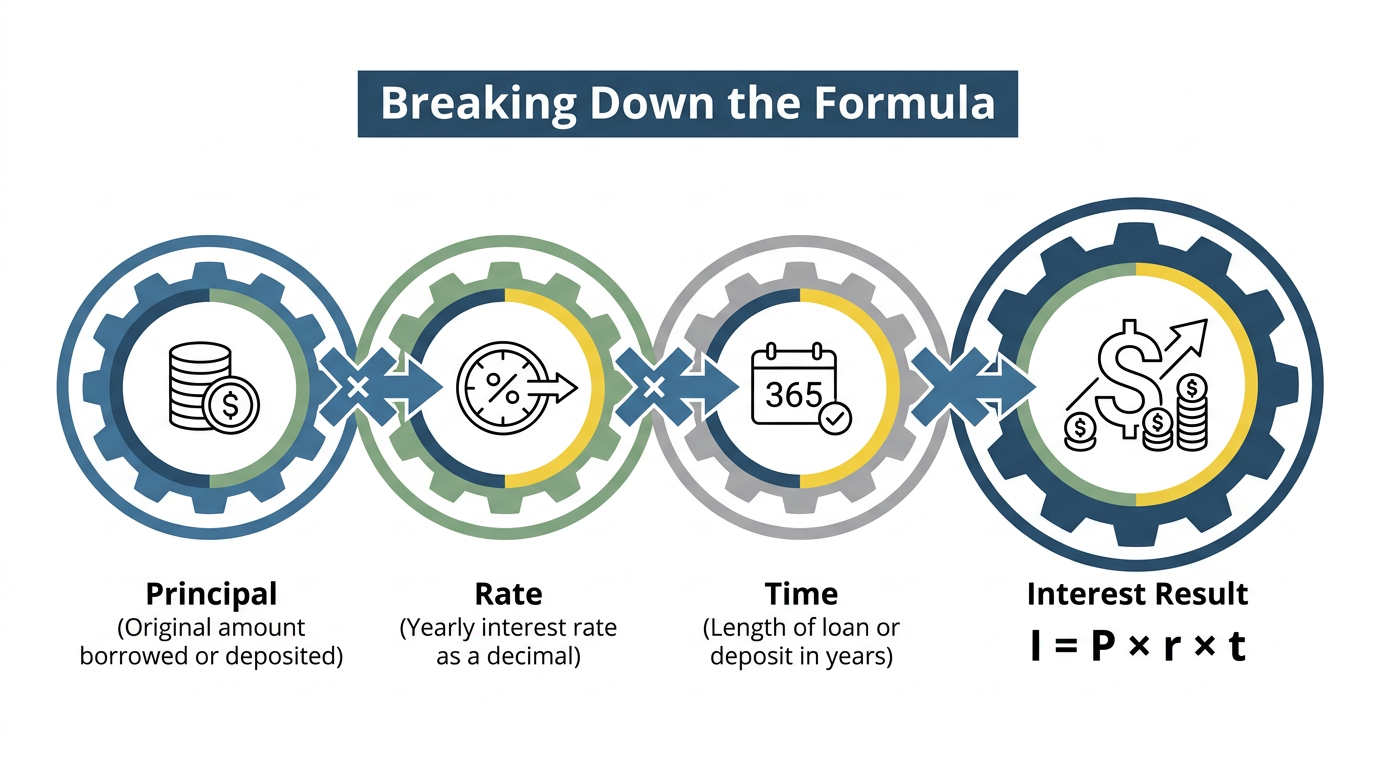
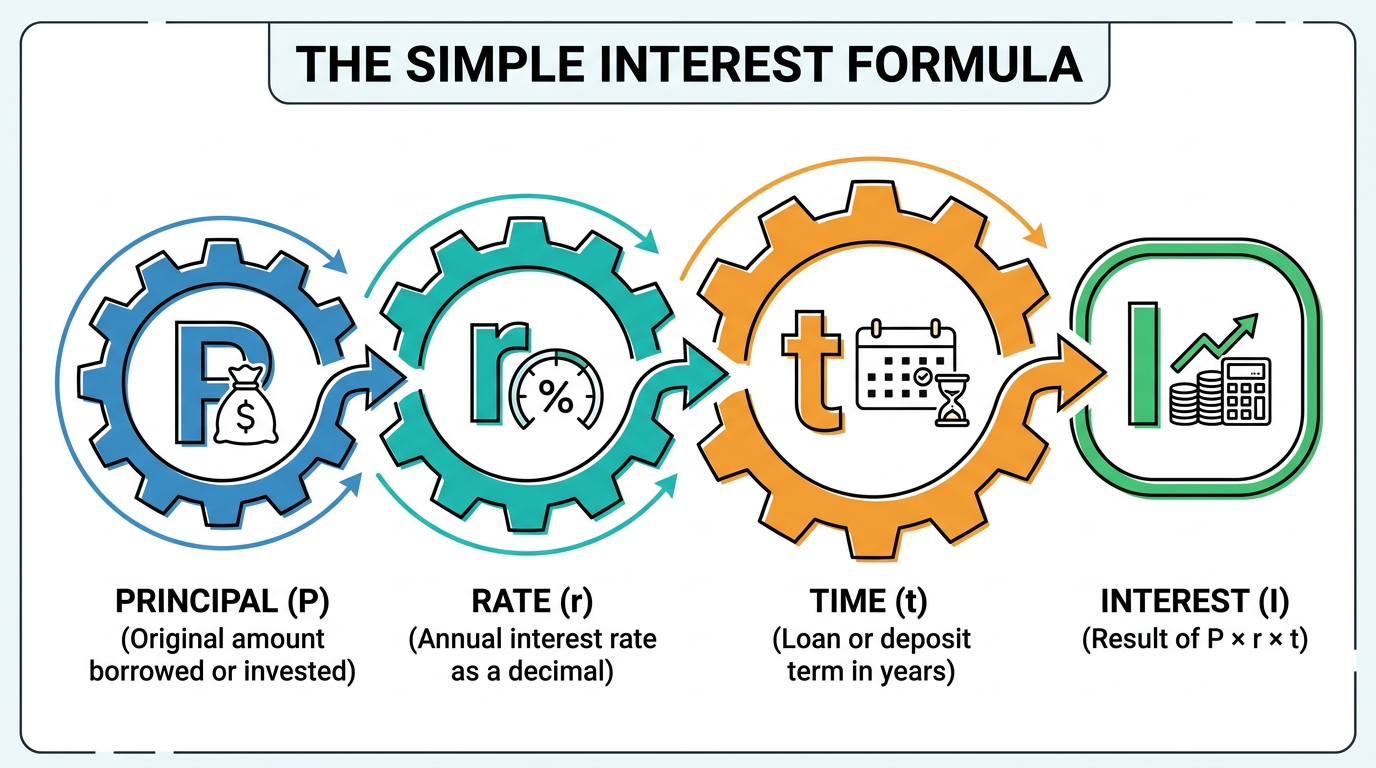
    The simple interest formula is I = P × r × t, a calculation that finds interest owed or earned using only the original principal, never any interest that built up before it. This is what makes simple interest so predictable compared to other interest calculations. In the formula, I stands for the interest amount, P stands for principal, r stands for the yearly interest rate written as a decimal, and t stands for the time period, usually measured in years. Because none of these variables change mid-calculation based on prior interest, the math stays simple enough to do on paper or in your head, which is exactly why so many everyday loans and short-term deposits still rely on it.

    Breaking down P, r, and t

    Each letter in the formula stands for something concrete you can pull straight from a loan agreement or account statement:

    • P is the principal, the actual dollar amount borrowed or deposited before any interest gets added.

    • r is the yearly percentage rate converted into a decimal, so 6% becomes 0.06 in the equation.

    • t is the length of the loan or deposit in years, though it can be written as a fraction, like 0.5 for six months.

    Finding the total amount owed or earned

    Knowing the interest alone only tells half the story, so most people also want the total amount, labeled A, sitting in an account or owed on a loan. That total comes from adding interest back to the principal, A = P + I, which simplifies to A = P(1 + rt) once you substitute in the original formula. This version saves a step whenever you need the final balance directly, rather than calculating interest first and adding it separately afterward.

    How do you calculate simple interest step by step?

    Step-by-step chart of simple interest calculation examples

    Calculating simple interest step by step means plugging your principal, rate, and time straight into I = Prt, a method outlined in detail in this simple interest applications guide, then adding that result back to the principal if you need the full balance. The process stays the same whether you’re checking a savings account, a car loan, or a student loan repayment, which is part of what makes this formula so approachable for anyone without a finance background. Once you see a few worked examples side by side, the pattern becomes obvious, and you’ll be able to run your own numbers on any loan offer or deposit account within a minute or two.

    Example: Interest over different time periods

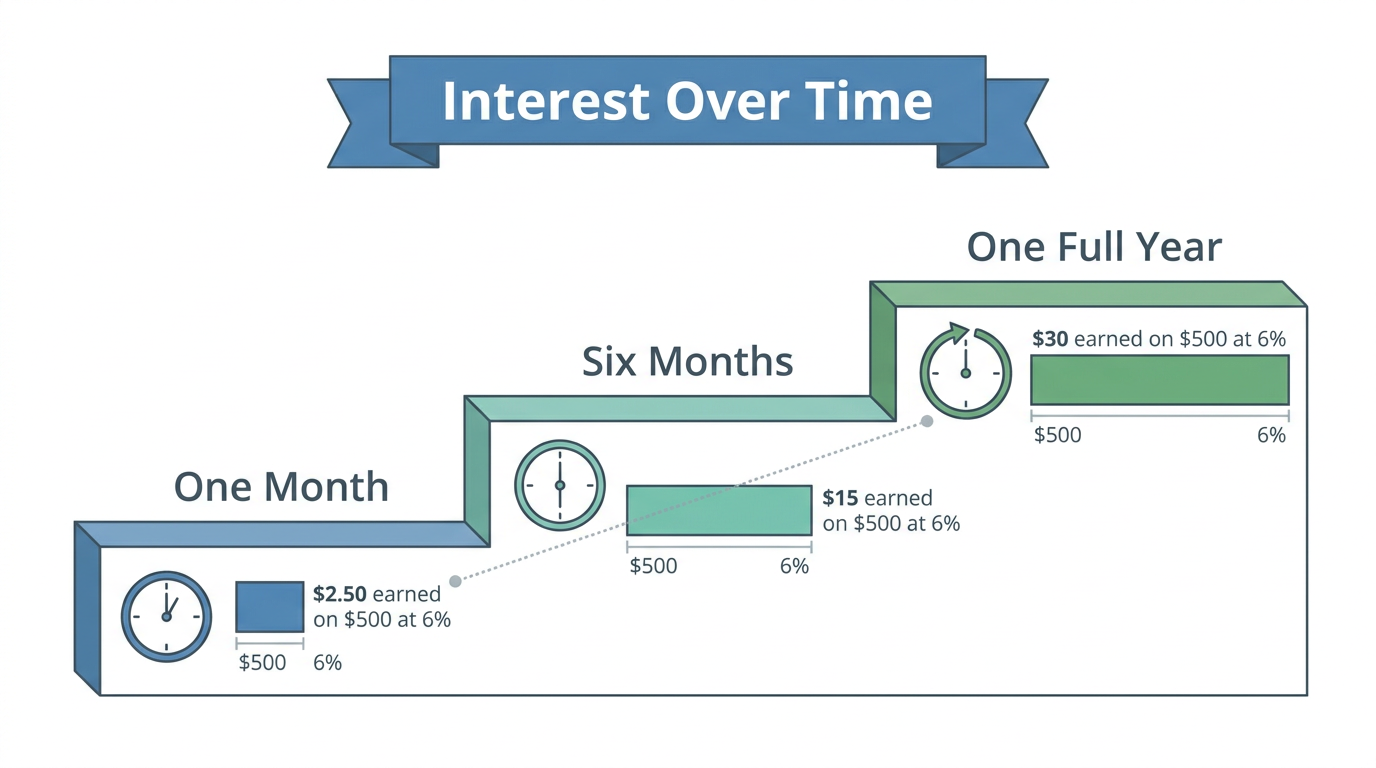
    Say you invest $500 at a 6% simple interest rate.

    • Over one month: I = (500)(0.06)(1/12) = $2.50

    • Over six months: I = (500)(0.06)(6/12) = $15

    • Over a full year: I = (500)(0.06)(1) = $30

    This shows how interest grows in a straight, proportional line as time passes.

    Example: Savings account and loan repayment

    Suppose someone deposits $200 into a savings account at a 12% simple interest rate. Using I = Prt, that’s I = (0.12)(200)(1), or $24 in interest for the year. Add that to the principal and the account holds $224 by year’s end, a quick example of A = P(1 + rt) in action.

    Now picture an $18,000 student loan carrying a 6% rate over a three-year term. The interest comes out to I = $18,000 × 0.06 × 3, or $3,240. Combined with the original principal, the borrower owes $21,240 by the time the loan term ends.

    Solving for principal or time

    The same formula rearranges easily whenever you know the total amount but need to find principal or time instead.

    • To solve for principal, use P = A / (1 + rt), which tells you how much to deposit today to hit a future savings goal.

    • To solve for time, use t = ((A/P) − 1) / r, which is handy for figuring out how many years it will take an investment or loan to reach a specific balance.

    Simple interest vs. compound interest: what’s the real difference?

    Comparison chart of simple versus compound interest

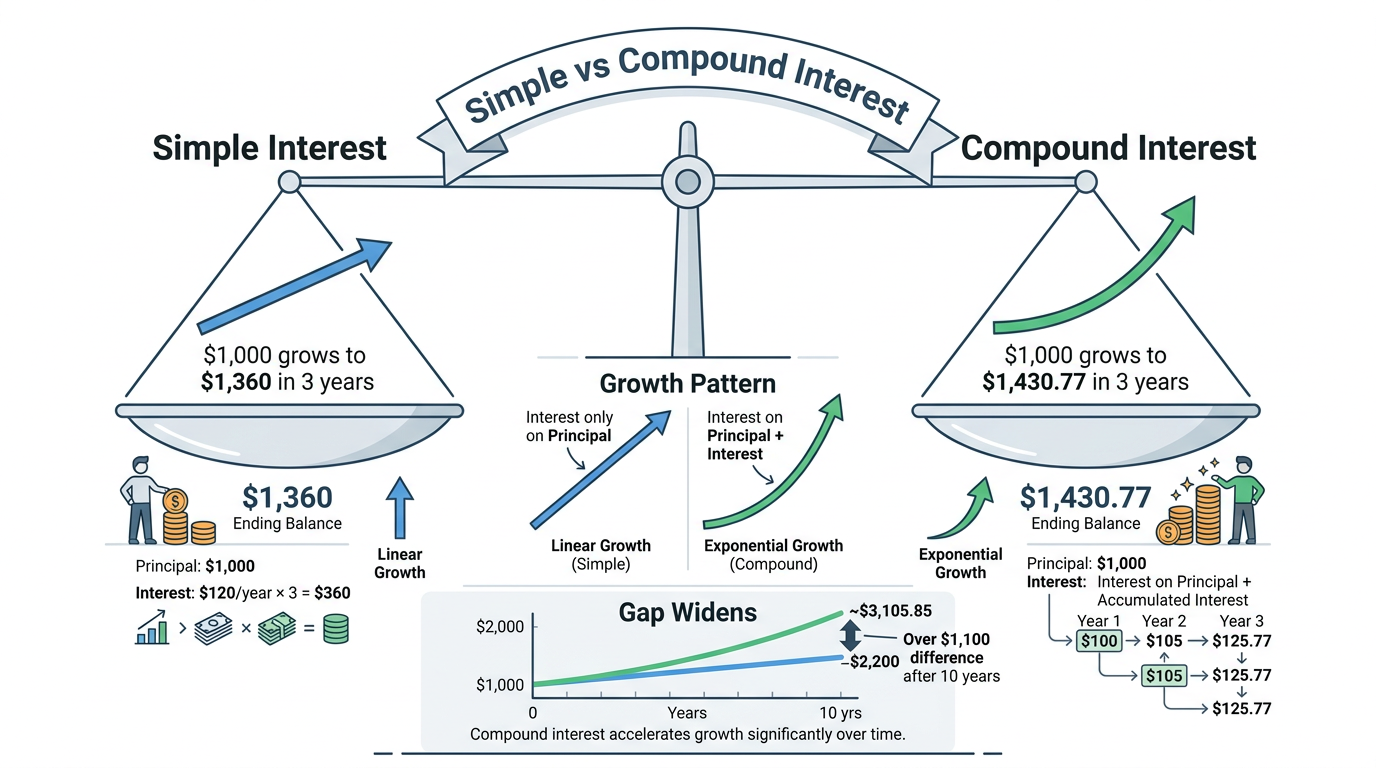
    The real difference between simple interest and compound interest comes down to whether interest is charged only on the original principal or on principal plus previously earned interest. Simple interest keeps the calculation flat and predictable, since the same principal gets used every single period. Compound interest, on the other hand, adds each period’s interest back into the balance, so future interest calculations grow from a larger number every time, creating what’s often called a snowball effect. Consider Sally and Ann, who each invest $1,000 at 12% for three years. Sally, earning simple interest, ends up with $1,360, while Ann, earning interest compounded monthly, ends up with $1,430.77, a $70.77 gap that widens to over $1,100 after ten years.

    Comparison table: simple vs. compound

    The table below lays out the practical differences side by side so you can see at a glance which method applies to your situation.

    FeatureSimple interestCompound interest
    Calculation basisOriginal principal onlyPrincipal plus prior interest
    Growth patternLinear, constant rateExponential, accelerating rate
    Typical productsAuto loans, student loansSavings accounts, credit cards
    Who benefits mostBorrowers pay lessSavers earn more

    Where is simple interest used in everyday finance?

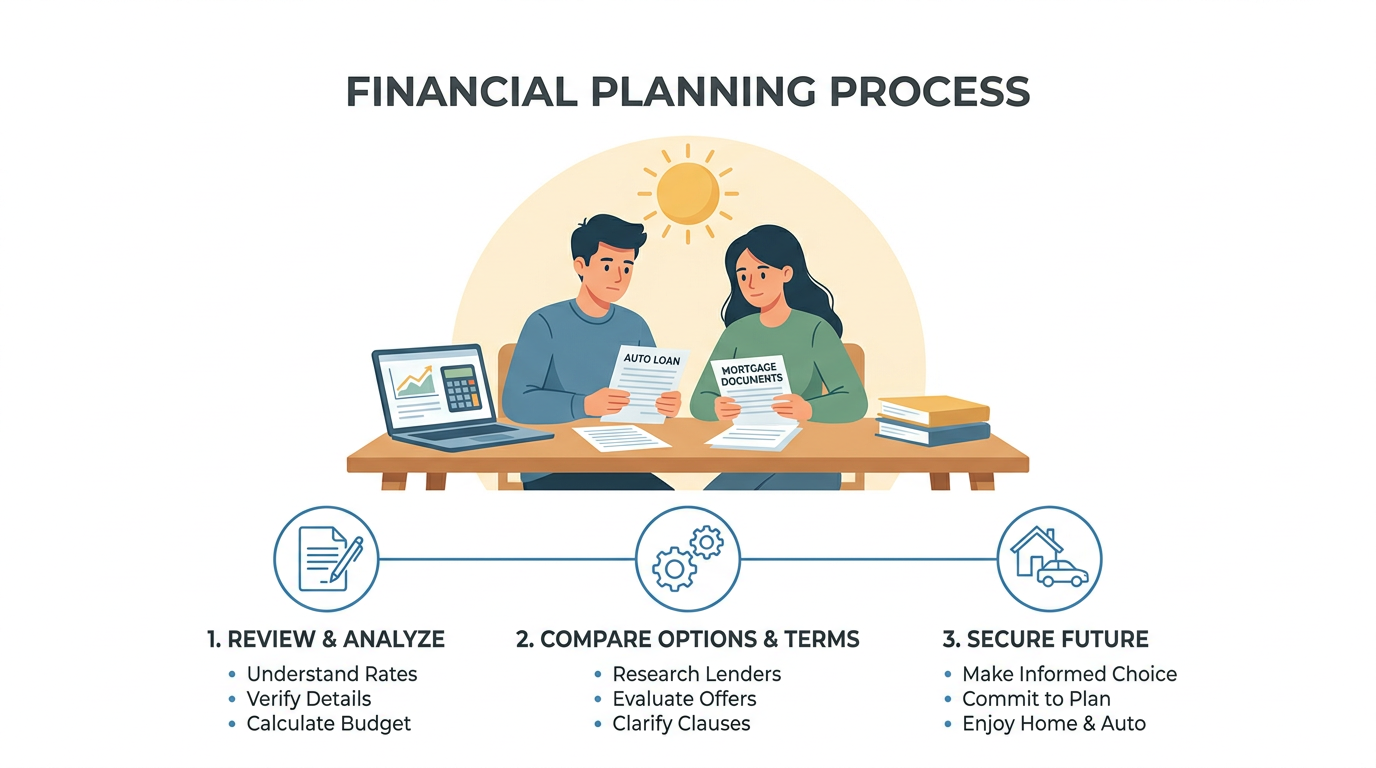
    Couple reviewing auto loan and mortgage paperwork together

    Simple interest shows up across several common financial products that most people encounter at some point. Auto loans, short-term personal loans, many student loans, and a good number of mortgages all calculate interest this way, which is part of why the formula is worth knowing even if you never touch a spreadsheet.

    One practical upside is that borrowers can often reduce total interest owed by paying extra toward the principal balance. Since interest is calculated fresh each period based only on the outstanding principal, a smaller balance means smaller future interest charges, and strategies like biweekly mortgage payments can shave real money off a loan over its full term.

    Skip the manual math with a free calculator

    Person calculating loan interest using online calculator

    Running the simple interest formula by hand works fine for a single loan or deposit, but checking several scenarios quickly gets tedious. Tools Repository offers a browser-based calculator built for exactly this kind of quick math, letting you plug in principal, rate, and time to see interest and total balance instantly without opening a spreadsheet.

    Since the tool runs entirely in your browser, none of your numbers get sent anywhere or stored on a server. There’s no sign-up, no subscription, and no cost involved, which fits well for students comparing loan offers or freelancers checking a client payment plan on the fly.

    The takeaway

    Two formulas do almost all the work here. I = Prt gives you the interest earned or owed, and A = P(1 + rt) gives you the full balance once that interest gets added back to the principal. Both stay simple because the principal used in the math never changes, no matter how many periods pass.

    Whether you’re comparing an auto loan, sizing up a student loan repayment, or projecting a savings account balance, these two equations cover most of what you’ll ever need. If you’d rather skip the manual plugging and checking, a free calculator like the one on Tools Repository can confirm your numbers in seconds, no strings attached.

    Frequently asked questions

    Question: What is the difference between simple interest and daily simple interest?
    Daily simple interest accrues every single day based on the current outstanding balance, rather than being calculated only up to a fixed due date. The balance also drops on the exact day a payment is received, not on a scheduled date, which matters for early or late payments.

    Question: Do mortgages use simple interest or compound interest?
    Most amortized mortgages in the U.S. technically use simple interest calculations. They can still feel like compound interest, though, since falling principal balances let more of each payment go toward principal over time, creating a similar snowball effect on paydown speed.

    Question: How do I lower the total interest I pay on a simple interest loan?
    Making extra payments directly toward the principal is the most reliable way to cut total interest owed. Since interest recalculates from the current balance each period, a smaller principal immediately reduces future charges, and switching to biweekly payments can shorten the loan term further.

    Question: Can the simple interest formula be used for savings accounts?
    Yes, some savings accounts and certificates of deposit pay simple interest rather than compound interest. The same formula, I = Prt, applies whether the money is being borrowed or deposited, so the math works identically in both directions.

    Question: What happens if I make a partial payment on a simple interest loan?
    A partial payment is applied to any interest that has already accrued first, before touching the principal balance. Only the amount left over after covering that accrued interest goes toward reducing what you actually owe on the loan.

  • How to Calculate Simple Interest: Formula & Examples

    How to Calculate Simple Interest: Formula & Examples

    How do you calculate simple interest step by step? You multiply the principal amount by the interest rate (as a decimal) and by the time period in years, using the formula I = P × r × t. This one formula answers most simple interest questions you’ll ever face, whether you’re checking a loan, a savings account, or a homework problem.

    Figuring out how to calculate simple interest trips up a lot of people, mostly because of two small steps that get skipped. You need to convert your percentage rate into a decimal, and you need to convert your time period into years if it’s given in months or days. Skip either step and your answer will be wrong, even if your math is otherwise perfect.

    This guide walks through the formula, shows several worked examples using real numbers, and covers how to solve for principal, rate, or time when those are the unknowns instead. We’ll also compare simple interest against compound interest, since knowing the difference actually changes which loans or savings accounts make sense for you. Along the way, we’ll point you toward some free calculators from Tools Repository that let you double-check your work without typing your numbers into some random site.

    Let’s start with the basics before moving into the step-by-step math.

    Key takeaways

    • The simple interest formula is I = P × r × t, where P is your principal, r is the annual rate as a decimal, and t is time in years.

    • To find the total amount owed or earned, use A = P(1 + rt), which combines principal and interest into one number.

    • Convert months into years by dividing by 12, and convert days into years by dividing by 365, before plugging them into t.

    • You can rearrange the formula to solve for principal, rate, or time, as long as you already know the other three values.

    • Simple interest tends to help borrowers by keeping costs predictable, while compound interest tends to help savers by growing money faster over time.

    Table of Contents

    What is simple interest and how does it work?

    Simple interest is a way of calculating interest that only applies to the original principal, the initial amount you borrowed, deposited, or invested. It never factors in any interest that’s already been earned or charged, which makes it a much more predictable calculation than the compounding method used by most credit cards and savings accounts. You’ll run into simple interest anytime you’re paying interest on a loan or earning interest on a deposit, since it applies in both directions.

    Because the base amount never shifts, simple interest grows at the same steady rate for the entire term. If you’re borrowing money, this usually works out in your favor, since you’re not paying interest on top of interest. If you’re saving or investing, it’s the opposite story, since your money grows more slowly than it would under compounding.

    Key characteristics of simple interest

    Simple interest carries a few defining traits that make it easier to plan around and easier to spot on paper. These traits show up whether you’re comparing loan offers or checking a CD’s terms before opening one.

    • Linearity means interest builds at a constant, unchanging rate the entire time, so a graph of the growth would be a straight line rather than a curve. This makes forecasting simple, since doubling the time period just doubles the interest.

    • Predictability comes from the fact that the rate and principal never change, so you can calculate the exact interest owed or earned at any point in the future. That’s useful for budgeting a loan payoff or planning around a fixed-term investment.

    • It applies in two directions, meaning it can show up as a charge on money you’ve borrowed or as earnings on money you’ve deposited, such as in a basic savings account, CD, or bond.

    How to calculate simple interest step by step

    Calculating simple interest step by step means multiplying your principal, your annual rate, and your time period together using I = P × r × t. Once you know what each letter stands for, the math itself takes just a few seconds on any calculator.

    The trick is getting your inputs into the right format before you multiply. Interest rates are usually written as percentages, and loan or deposit terms aren’t always given in a neat number of years, so a little prep work upfront saves you from a wrong answer later.

    The simple interest formula explained

    Infographic breaking down the simple interest formula parts

    The formula breaks down into three parts, each representing a piece of your financial situation. Understanding what each letter means makes the whole thing much less intimidating, whether you’re a student working through homework or a freelancer sizing up a loan offer.

    • P stands for principal, the original amount of money borrowed, deposited, or invested, before any interest gets added.

    • r stands for the annual interest rate, but it must be written as a decimal rather than a percentage. To convert, just divide the percentage by 100, so 5% becomes 0.05 and 3.875% becomes 0.03875.

    • t stands for time, expressed in years, which means you need to convert months or days into a fraction of a year before using them in the formula.

    One rule matters more than any other here: r and t need to use matching time units. If your rate is annual, your time needs to be in years too, or your answer will be off by a wide margin.

    Worked example: calculating interest on a loan

    Infographic of a step-by-step loan interest calculation

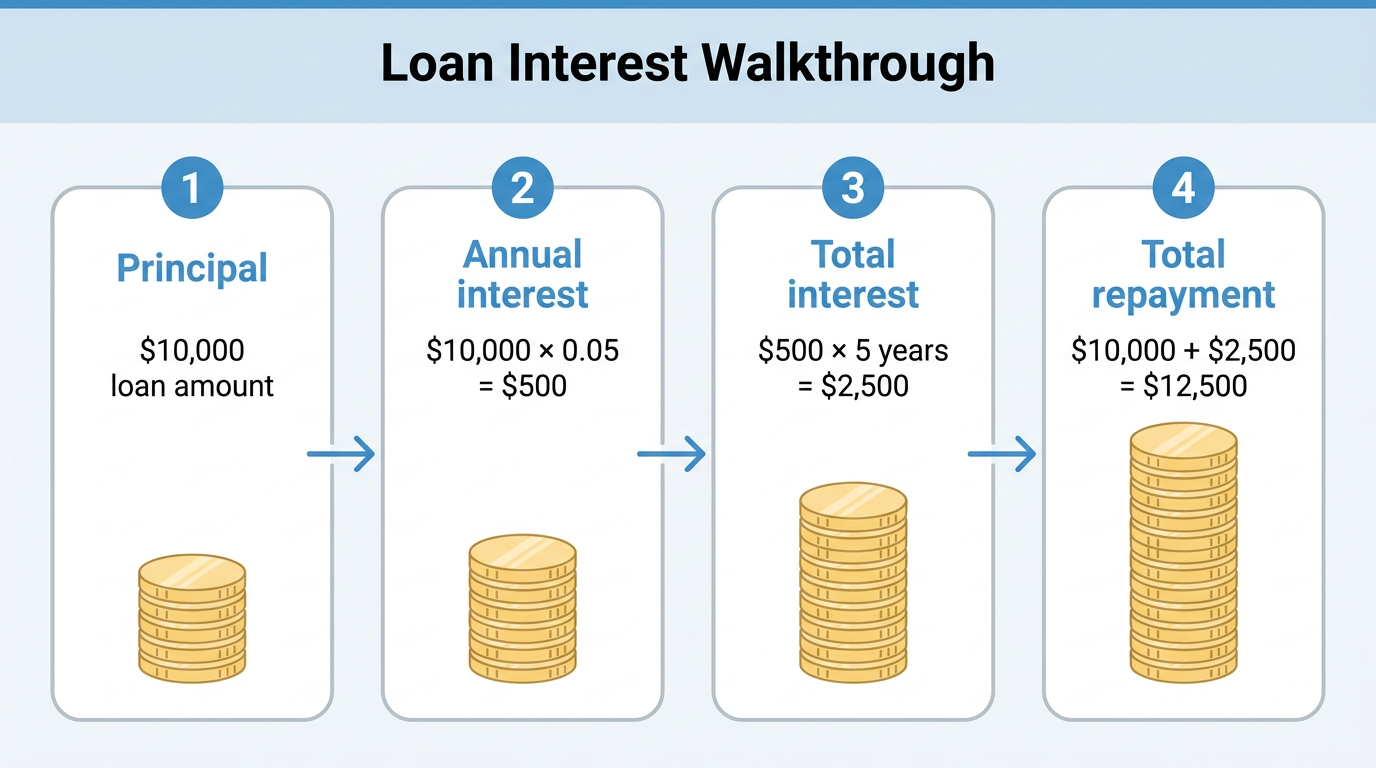
    Picture a $10,000 loan at a 5% annual simple interest rate, repaid over 5 years. Working through this with real numbers makes the formula click a lot faster than staring at letters.

    First, multiply the principal by the annual rate: $10,000 × 0.05 = $500. That $500 represents one year’s worth of interest. Next, multiply that number by the number of years in the loan term: $500 × 5 = $2,500. That’s your total interest owed across the entire loan.

    To find your total repayment amount, just add that interest back to the principal: $10,000 + $2,500 = $12,500. If you wanted a monthly or daily interest figure instead, you could divide that $2,500 total by the number of months or days in the loan term.

    Finding the total amount: A = P(1 + rt)

    If what you actually want is the total balance, principal plus interest combined, there’s a faster route than calculating interest separately and adding it in afterward. The formula A = P(1 + rt) gets you there in a single pass, since it factors the principal out algebraically from A = P + Prt.

    Say you invest $10,000 at 3.875% annual interest for 5 years. First, convert the rate to a decimal, giving you 0.03875. Plug that into the formula: A = 10,000 × (1 + (0.03875 × 5)), which simplifies to A = 10,000 × 1.19375, landing on a final total of $11,937.50.

    To isolate just the interest earned, subtract the principal from that total: $11,937.50 − $10,000 = $1,937.50. That’s the exact same interest figure you’d get using I = Prt separately, just reached in fewer steps.

    Calculating simple interest for months or days

    Loan and deposit terms don’t always land on a clean number of years, so you’ll often need to convert a shorter period into its equivalent fraction of a year. For months, divide by 12. For days, divide by 365, which is the standard convention used in most simple interest calculations.

    Say you open a 9-month CD for $10,000 at a 4% rate. Converting 9 months to years gives you 9 ÷ 12 = 0.75. Plugging that into A = P(1 + rt) gives A = 10,000 × (1 + (0.04 × 0.75)) = $10,300, meaning you’d earn $300 in interest.

    Now try a 548-day investment of $10,200 at 3.5%. Converting days to years gives 548 ÷ 365 = 1.50137. That produces A = 10,200 × (1 + (0.035 × 1.50137)) = $10,735.99, or $535.99 in interest earned. Some banks use a 360-day year instead of 365 for certain commercial calculations, so it’s worth checking your specific agreement if the numbers ever look slightly off from what you expect.

    How to solve for principal, rate, or time

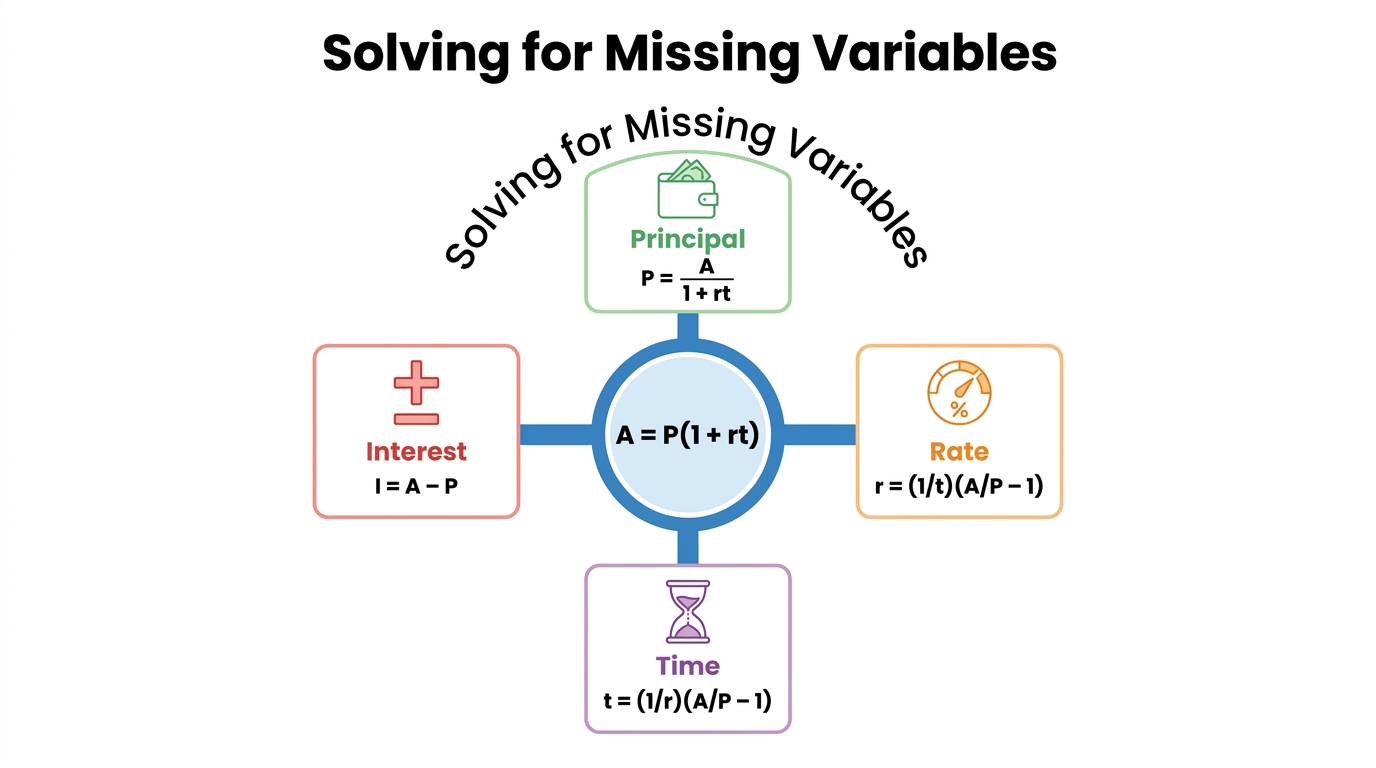
    Solving for principal, rate, or time means rearranging the simple interest formula algebraically, so any one of the four core variables (A, P, r, or t) can be found as long as you already know the other three. This comes in handy when you know your goal but need to work backward to figure out the missing piece.

    Maybe you know how much you want to save and by when, but need to figure out what rate would get you there. Or maybe you know your rate and goal but need to figure out how long it’ll take. Either way, the same four core relationships cover every scenario.

    Rearranged formulas for each variable

    Infographic of rearranged formulas for principal rate and time

    Here’s a quick reference you can bookmark for whenever you need to solve for something other than total interest.

    • P = A / (1 + rt) lets you calculate the starting principal needed to reach a target total amount.

    • r = (1/t)(A/P − 1) lets you calculate the annual interest rate needed to grow a starting amount into a target total within a set time.

    • t = (1/r)(A/P − 1) lets you calculate how long it’ll take to reach a target total at a known rate.

    • I = A − P lets you calculate the interest amount alone once you already know both the total and the principal.

    Worked example: solving for the interest rate

    Say you want to grow $22,000 into $26,800 over 4 years, and you need to know what rate would get you there. Using r = (1/t)(A/P − 1), you’d substitute in your known values.

    That gives you r = (1/4)((26,800 / 22,000) − 1), which simplifies to (0.25)(1.218 − 1), or (0.25)(0.218). That works out to r = 0.0545. Multiply by 100 to convert to a percentage, and you land on 5.45%, meaning you’d need an annual simple interest rate of 5.45% to hit your $26,800 goal.

    Simple interest vs. compound interest: which matters more?

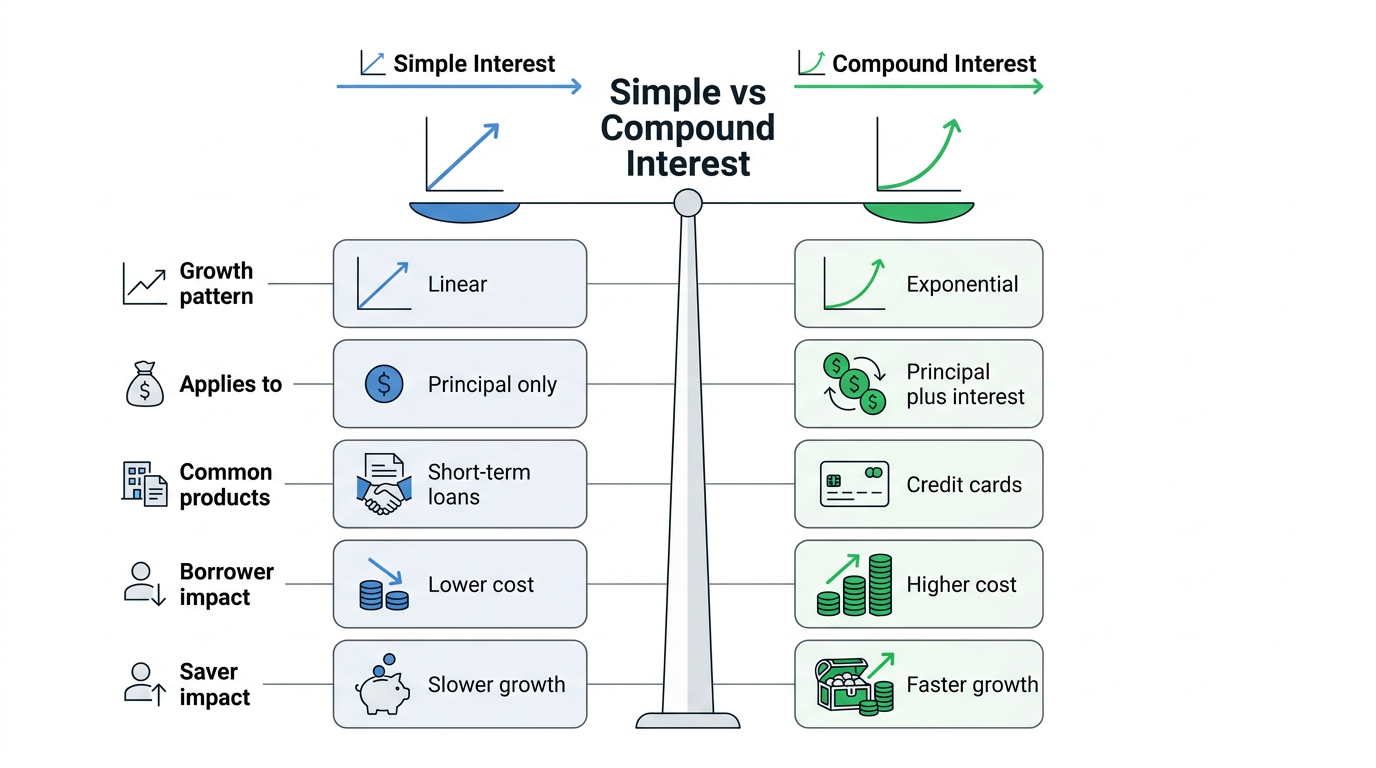
    Simple interest and compound interest differ in one key way, compound interest charges or earns “interest on interest,” while simple interest never does. That single difference can add up to a meaningful gap in your total costs or earnings, especially over longer terms.

    Compound interest recalculates the balance at the end of every compounding period, folding the newly earned interest back into the principal before the next round of interest gets calculated. This creates accelerating growth rather than the flat, linear growth you get with simple interest.

    Key differences at a glance

    Comparison infographic of simple versus compound interest

    The table below breaks down how these two methods stack up against each other in practice.

    FeatureSimple interestCompound interest
    Growth patternLinear, constant rateExponential, accelerates over time
    Applies toOriginal principal onlyPrincipal plus prior interest
    Common productsShort-term loans, some bondsCredit cards, most savings accounts
    Borrower impactLower total costHigher total cost
    Saver impactSlower growthFaster growth

    Side-by-side example: $10,000 loan over 5 years

    Numbers make this difference much easier to feel than definitions alone. Take a $10,000 loan at 5% interest over 5 years, and compare both methods directly.

    With simple interest, your total repayment lands at $12,500, made up of $10,000 principal and $2,500 interest. With interest compounded monthly instead, that total rises to $12,833.59, made up of the same $10,000 principal but $2,833.59 in interest. That’s a $333.59 difference on a fairly modest loan, and the gap only widens further with higher rates, longer terms, or more frequent compounding.

    Which one benefits you?

    Whether simple or compound interest works in your favor depends entirely on which side of the transaction you’re on. As a borrower, simple interest usually costs you less overall, since you’re never paying interest on interest you’ve already been charged.

    As a saver or investor, compound interest usually works better, since your balance grows faster the longer you leave it untouched, a dynamic explored in a comparative analysis of pension fund growth models that contrasts simple and compound interest outcomes over time. Understanding this distinction before signing any loan agreement or opening any savings account can save you real money down the road.

    Tip: Before signing any loan or savings agreement, ask whether the interest is simple or compound, and how often it compounds if applicable. That single question can change your total cost or return by a noticeable margin.

    Verify your math with free calculators

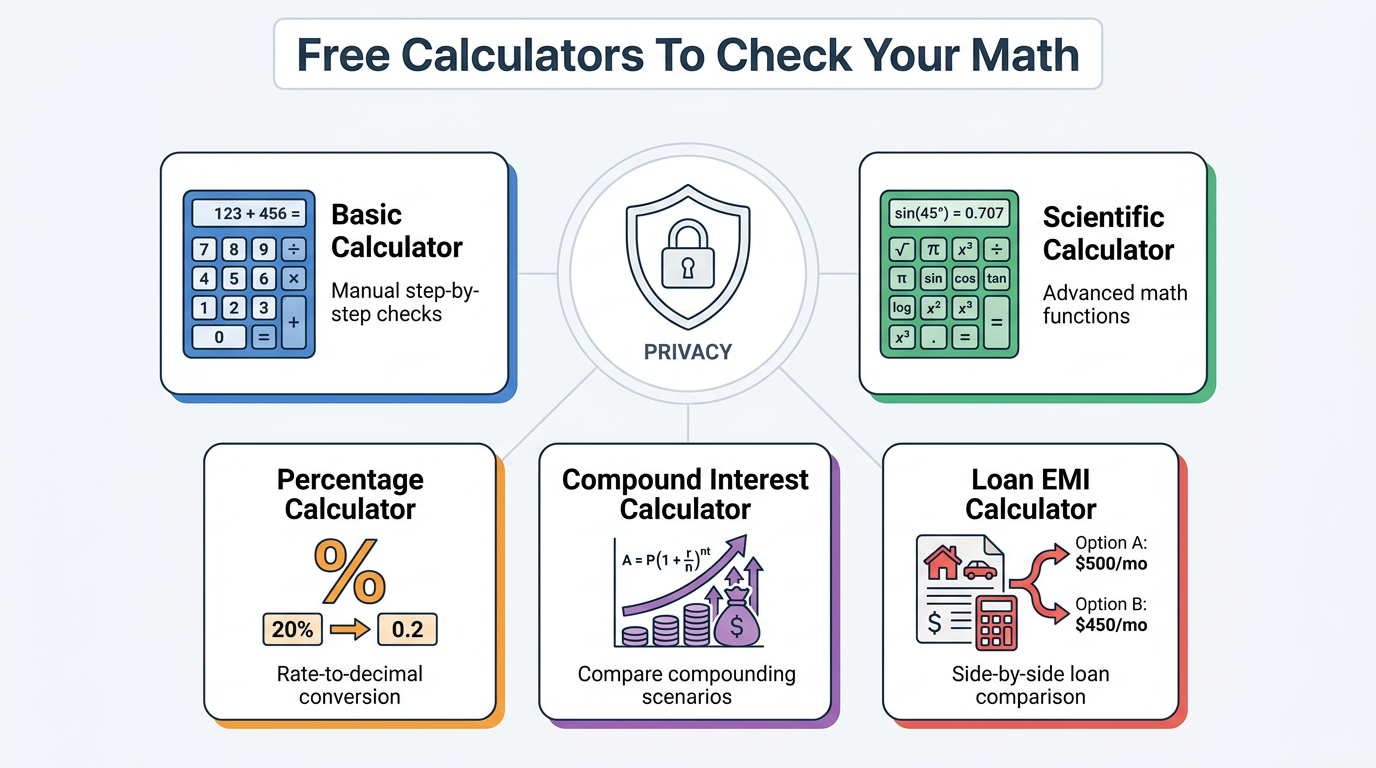
    Infographic listing free calculators for checking interest math

    Verifying your simple interest math means running your numbers through a second, independent tool before making any financial decision based on them. This step catches small errors, like a misplaced decimal or a rate that wasn’t converted properly, before they turn into a wrong loan comparison or a bad savings estimate.

    Tools Repository offers a Basic Calculator and a Scientific Calculator that work well for manually re-checking each step of I = P × r × t, plus a Percentage Calculator that handles the rate-to-decimal conversion cleanly. If you want to compare your simple interest results against a compounding scenario, its Compound Interest Calculator and Loan EMI Calculator make that side-by-side comparison quick and painless.

    Every tool on the platform runs entirely in your browser, meaning your loan amounts, rates, and other financial details never get stored, tracked, or sent anywhere. That’s a meaningful difference from calculator sites that ask for an account or quietly log your inputs.

    • All calculators are free, with no sign-up or subscription required at any point.

    • Results are calculated directly on your device, so sensitive financial figures stay private.

    • Tools work across desktop, tablet, and mobile without needing any installation.

    Keep in mind that these calculators are meant for quick estimates and learning purposes, not as a substitute for professional financial advice. For anything involving a significant loan, investment, or contract, it’s worth talking to a qualified financial advisor before making a final decision.

    Frequently asked questions

    Question: How do you calculate simple interest on a loan?

    You apply the formula I = P × r × t, multiplying the loan’s principal by its annual rate (as a decimal) and by the loan term in years. If your term is given in months or days, convert it into years first by dividing by 12 or 365. This keeps your rate and time period in matching units.

    Question: What is the difference between I = Prt and I = Prn?

    I = Prt uses an annual interest rate paired with time expressed in years. I = Prn instead uses a periodic rate, like a monthly rate, paired with the number of periods (n) rather than years. Mixing these up, using an annual rate with a period count, will give you an incorrect result.

    Question: Can simple interest change over the life of a loan?

    No, the rate and the principal base stay fixed for the entire loan term under simple interest. The one exception involves savings accounts, where additional deposits or withdrawals change the effective principal being used, which then changes how much interest accrues going forward.

    Question: What types of loans or accounts use simple interest?

    Short-term loans, some fixed-coupon bonds, and certain short-term CDs commonly use simple interest because of its predictability, a linear growth model examined in comparative research on pension fund interest structures that contrasts it with compounding alternatives. Most everyday financial products people use daily, including credit cards and standard savings accounts, rely on compound interest instead, which behaves quite differently over time.

    Question: How do I calculate simple interest for a partial year, like 3 months?

    Divide 3 by 12 to get 0.25, which represents three months as a fraction of a year. Plug that 0.25 in as your value for t in the formula I = P × r × t, keeping your rate in its usual annual decimal form.

    Question: Is a 360-day or 365-day year used for simple interest?

    A 365-day year is the standard convention used for most simple interest calculations. A 360-day year sometimes shows up in commercial or banking contexts instead, so it’s worth double-checking your loan agreement or account terms to confirm which one applies to your situation.

    The takeaway

    Calculating simple interest really comes down to two formulas, I = P × r × t for interest alone, and A = P(1 + rt) when you need the total balance instead. Once you convert your rate to a decimal and your time period into years, the math itself is quick multiplication that anyone can do by hand or on a phone calculator.

    Whether you’re a student working through a finance assignment, a freelancer comparing loan offers, or a small business owner planning around a short-term CD, these two formulas cover nearly every situation you’ll run into. Before locking in any financial decision, it’s worth running your numbers through a second source, and Tools Repository’s free, private calculators offer a fast way to confirm your math without giving up any personal data in the process.

  • Free Online Character Counter Tool (No Sign-Up)

    Free Online Character Counter Tool (No Sign-Up)

    Pasting your text into a counting site only to run into pop-up ads or a forced sign-up screen gets old fast. You just need a number, not a new account to manage. The best free online character counter tool solves this by counting characters, words, sentences, and paragraphs the instant you type, right inside your browser, with no login and nothing to install. Tools Repository builds exactly this kind of utility, made for anyone who needs a quick, accurate text count without extra steps standing in the way.

    This guide walks through what an online character counter tool actually does, how to use one in a few simple steps, and why character limits matter across so many platforms. You’ll also see why a privacy-first, no sign-up approach beats the cluttered alternatives most people are used to. By the end, you’ll know exactly how to pick and use a counter that fits your workflow.

    Key takeaways

    • A free online character counter tool needs no sign-up, no payment, and no software install to give you instant results.

    • Client-side processing means your text stays in your browser and is never stored or sent to a server.

    • Real-time counts cover characters, words, sentences, and paragraphs as you type or paste.

    • Platforms like Twitter/X, meta descriptions, and resumes all enforce strict character limits worth knowing.

    • Tools Repository pairs its character counter with other free text tools for a complete writing workflow.

    Table of Contents

    What is an online character counter tool?

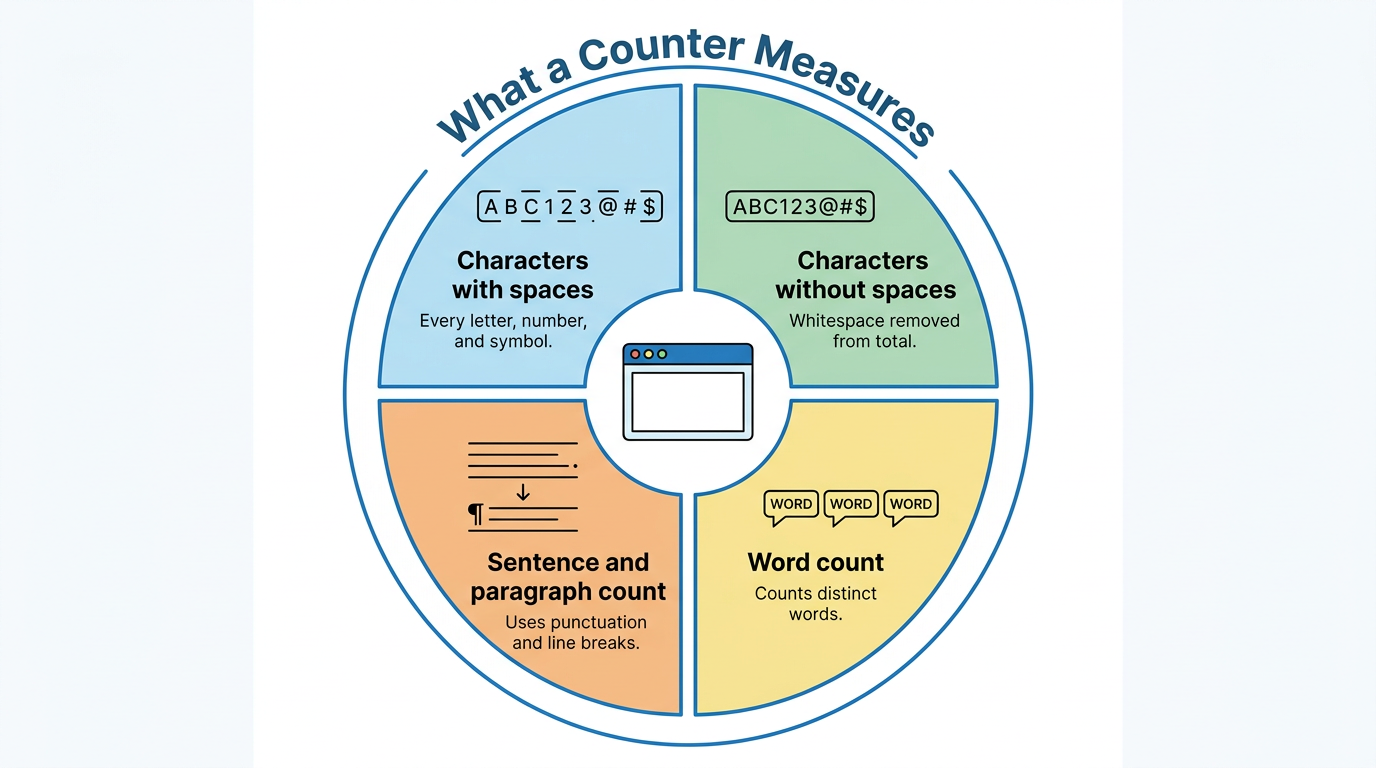
    Infographic of core text metrics tracked by counter tool

    An online character counter tool is a browser-based utility that counts the characters, words, sentences, and paragraphs in any text you type or paste. It works instantly, without needing you to click a submit button or wait for a page to reload. Instead of manually counting letters in an email draft or a tweet, you get a live, accurate readout the moment your text hits the box.

    Most tools track a handful of core metrics side by side. Character count with spaces includes every letter, number, symbol, and blank space in your text. Character count without spaces strips out whitespace, which matters for platforms or forms that only measure visible characters. Word count tallies distinct words, sentence count uses punctuation like periods and question marks to mark boundaries, and paragraph count follows line breaks in your document.

    Some tools go further with extras like syllable counts, average word length, or a readability score such as the Dale-Chall formula, which checks your text against a list of familiar, everyday words. These added layers help writers judge whether their content matches the reading level of their audience. For most everyday tasks, though, the basic character and word counts already solve the core problem.

    How does a character counter actually work?

    A character counter works by scanning your text the moment you type or paste it, applying character-level tokenization logic similar to methods explored in research on language models over characters, with no submit button required. Behind the scenes, it applies simple rules, treating spaces and punctuation as boundaries between words and sentences. Every keystroke triggers a fresh calculation, so the numbers on screen update live rather than after you finish writing.

    This real-time approach is what separates a dedicated counter from a word processor’s built-in stats, which often update only when you check a menu. Because the logic runs directly in your browser, there’s no delay waiting for a server to respond. You see character, word, sentence, and paragraph totals change as fast as you can type.

    How do I use a free online character counter?

    Using a free online character counter starts with pasting or typing your text into an open input box, and results appear immediately with no extra clicks. There’s no account to create, no software to download, and no waiting period before you can see your numbers. This makes the process almost identical no matter which counter you choose, since the workflow itself is built to be as simple as possible.

    Most tools follow the same basic pattern from start to finish. You add your text, review the live statistics, adjust a setting or two if the tool offers them, and then copy your finished content once it fits your limit. The steps below break this down in more detail, followed by a look at what makes a well-built counter worth choosing over a cluttered alternative.

    Step-by-step: from pasting text to seeing your count

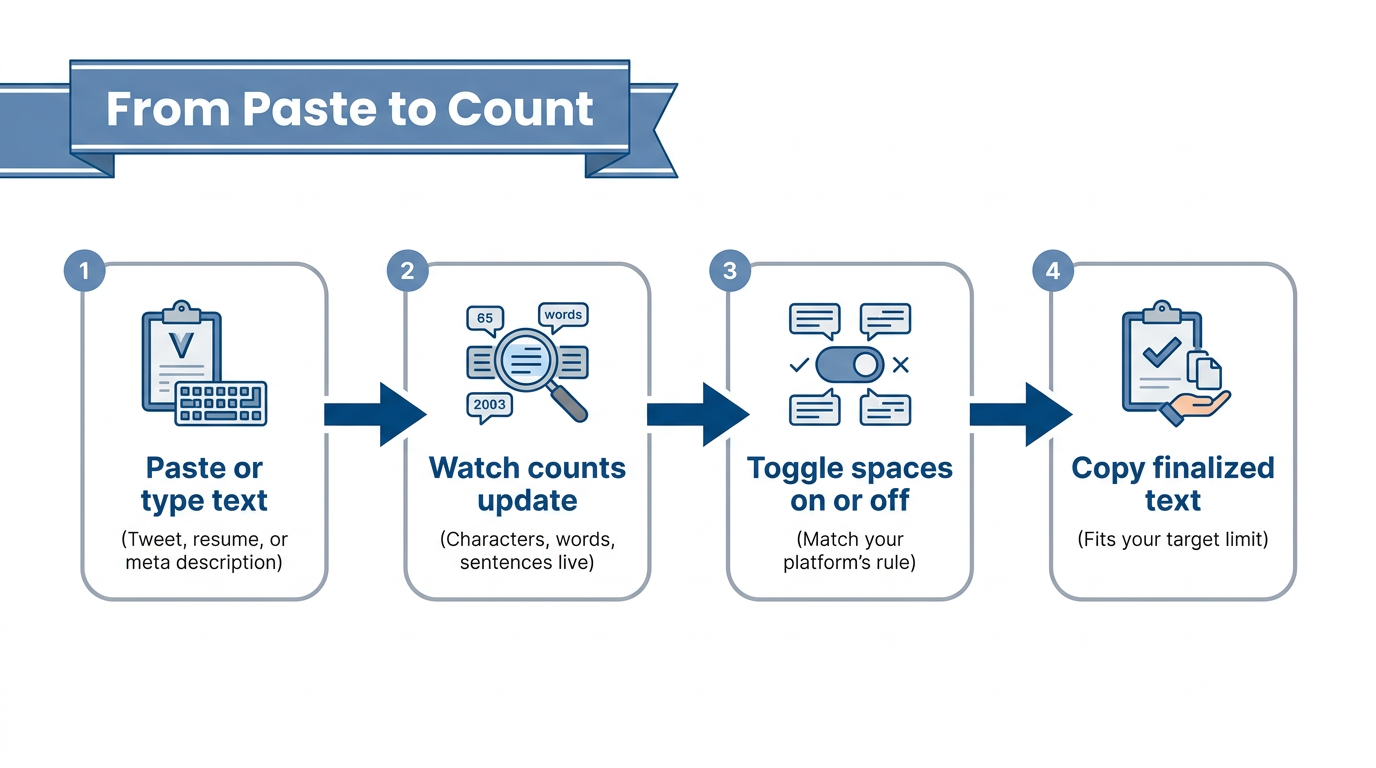
    Step-by-step infographic on using character counter tool

    Getting a character count takes only a few seconds once you know the basic flow. Here’s how the process typically works across most tools.

    1. Paste or type your text directly into the input box, whether it’s a tweet draft, a resume line, or a meta description.

    2. Watch the character, word, sentence, and paragraph counts update instantly as you type or edit, no refresh needed.

    3. Toggle between counting with spaces or without spaces, depending on whether your platform’s limit counts blank space.

    4. Copy your finalized text once the numbers confirm it fits within your target limit, then paste it wherever it needs to go.

    This short sequence works the same whether you’re checking a single sentence or a full page of copy. Because every step happens in the browser, you can repeat it as many times as needed without losing your place.

    Why Tools Repository’s character counter stands out

    Tools Repository’s character counter stands out by skipping every barrier that usually slows this task down, no sign-up, no cost, and no hidden tiers. You simply open the page and start typing, and the count appears right away. There’s no account wall between you and the numbers you need.

    The tool also processes text entirely inside your browser, so nothing you paste gets stored or sent to a server elsewhere. That matters if you’re checking a client contract, a draft resume, or any text you’d rather keep private. It also handles large blocks of text smoothly and works just as well on a phone or tablet as it does on a desktop screen.

    Why do character limits matter across different platforms?

    Character limits matter because exceeding them causes your text to get cut off, rejected, or displayed incorrectly on the platform you’re posting to. A caption that runs too long on Twitter/X simply won’t post, and a meta description that’s too wordy gets truncated in Google’s search results with an awkward ellipsis. These aren’t arbitrary rules either, they usually come from database limits, screen space, or how much text a reader can scan comfortably.

    Knowing a platform’s limit ahead of time saves you from last-minute editing scrambles. A resume that runs over one page, a product listing that gets rejected by eBay, or a tweet that won’t send all trace back to the same root cause, not checking the character count before hitting submit. Running your draft through an online character counter tool first avoids that entirely.

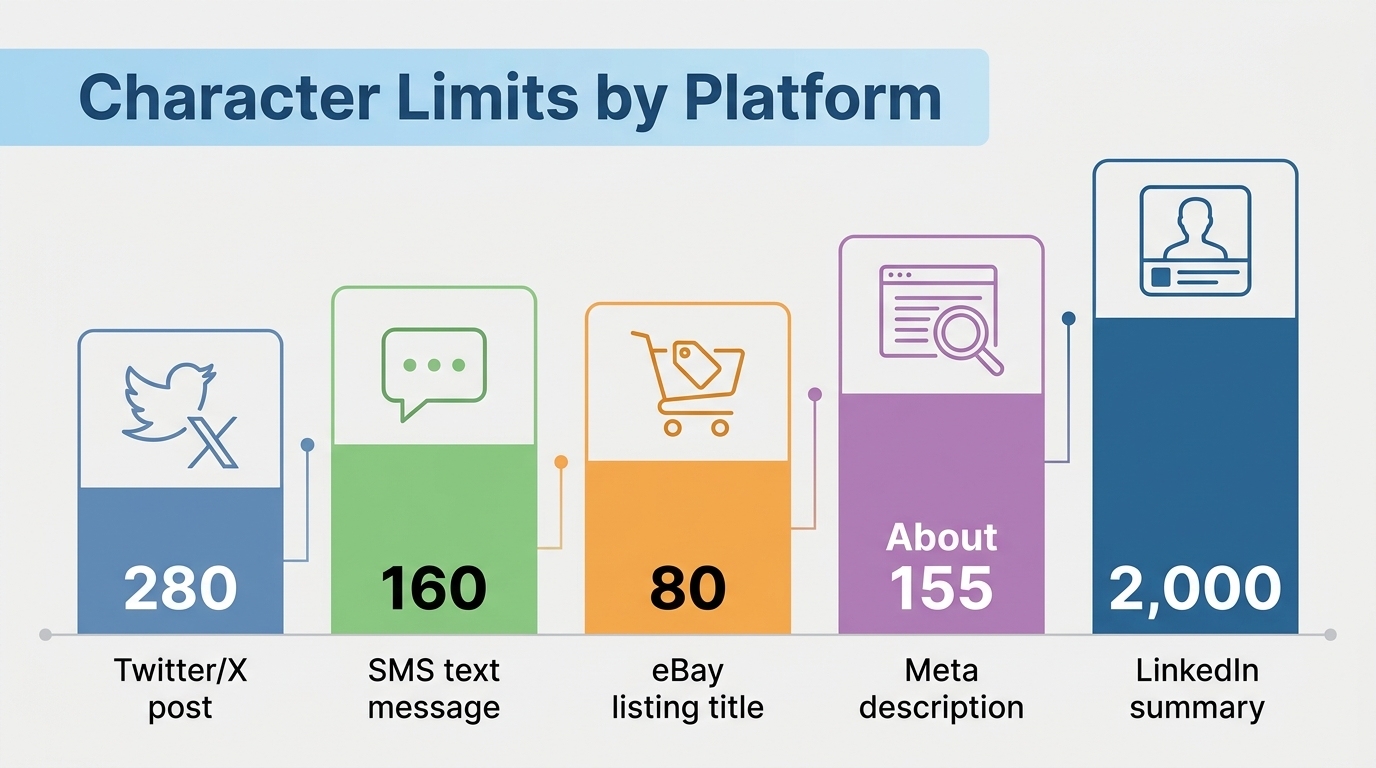
    Common character limits you should know

    Infographic comparing character limits across popular platforms

    A handful of platforms account for most of the character limit issues writers and marketers run into. The table below covers five of the most common ones worth keeping in mind.

    PlatformCharacter limit
    Twitter/X post280 characters
    SMS text message160 characters
    eBay listing title80 characters
    Meta description (Google search)~155 characters displayed
    LinkedIn summary2,000 characters

    These limits shift occasionally as platforms update their rules, so it’s worth double-checking a current count rather than relying on memory. A quick paste into a counter confirms whether your draft fits before you commit to publishing it.

    Tip: When in doubt, count first and edit second. It’s faster to trim ten characters than to rewrite an entire sentence after a platform rejects your post.

    Who relies on character counts most?

    Freelancer reviewing text length on laptop at desk

    Certain roles run into character limits daily as a normal part of their work.

    • Web developers regularly check meta tags, alt text, and form field values to keep dynamic content from breaking layout rules.

    • Students track essay word and character minimums or maximums to meet assignment guidelines and avoid losing points for formatting alone.

    • Freelancers and small business owners lean on character counts just as often, whether fitting a resume onto a single page or squeezing a product description into an eBay title.

    • Copyeditors use the same counts alongside readability metrics to judge whether content matches its intended audience.

    Across all these roles, the underlying need stays the same, a fast, reliable number before hitting publish or submit.

    What else can a text tool suite do for you?

    A text tool suite extends beyond character counting to cover the other small, repetitive tasks that come up while writing, editing, or preparing content for the web. Instead of bouncing between different single-purpose sites for each task, a bundled toolkit keeps formatting, cleanup, and SEO-related utilities in one place. This matters most for writers, developers, and designers juggling several text-related jobs in a single sitting.

    Tools Repository takes this approach with its broader collection of free utilities built around the same no sign-up, browser-based model as its character counter. Each tool solves one specific, narrow problem well rather than trying to do everything at once. That focus keeps each utility fast and simple to use without a learning curve.

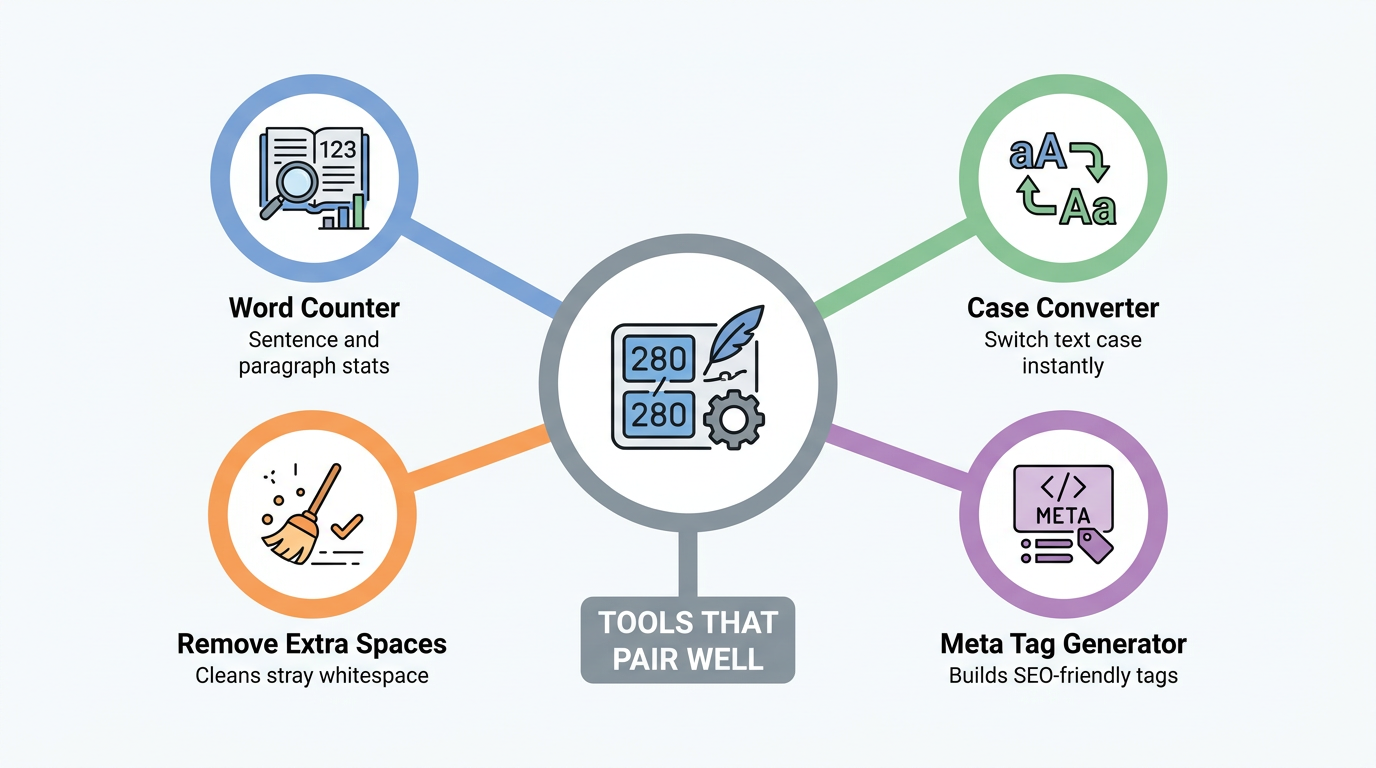
    Free tools that pair well with character counting

    Infographic of tools that pair with character counter

    Pairing a character counter with a few complementary tools covers most day-to-day text tasks without switching platforms. The list below highlights a few worth knowing.

    • Word Counter breaks text down further into sentence and paragraph statistics, useful when you need more than a raw character total.

    • Case Converter switches text between uppercase, lowercase, and title case in one click, handy for headlines or formatted titles.

    • Meta Tag Generator builds SEO-friendly meta tags while keeping fields like descriptions within their display limits.

    • Remove Extra Spaces cleans up stray whitespace and blank lines before you publish or submit a final draft.

    The takeaway

    A free, no sign-up character counter saves real time by giving you an instant, private way to check your text before you publish, submit, or post it anywhere. There’s no account to create, no ad-cluttered interface to fight through, and no risk of your draft sitting on someone else’s server. Tools Repository’s version follows this same approach, running the count entirely in your browser so your text stays yours.

    Next time you’re trimming a tweet, checking an eBay title, or fitting a resume onto one page, try pasting your draft into a counter before you second-guess the length by eye. Pair it with the rest of the toolkit for a one-stop way to format, clean, and check your content in the same sitting.

    Frequently asked questions

    Question: Is there a free character counter with no sign-up required?

    Yes, most modern character counters, including the one on Tools Repository, are completely free and require no registration. You simply open the page in your browser and start typing or pasting text. Results appear instantly with no account, email, or payment needed at any point.

    Question: Does a character counter tool store or track my text?

    A well-built character counter processes your text entirely on the client side, meaning it runs in your browser rather than on a remote server. This means your input is never uploaded, stored, or tracked. Once you close the tab, the text is gone, with nothing saved anywhere else.

    Question: What’s the difference between character count and word count?

    Character count measures every individual letter, number, symbol, and space in your text, a distinction confirmed in studies measuring word counts, character counts, and proportion of dictionary words across writing tasks. Word count instead measures distinct words, typically separated by spaces. A short word like cat counts as one word but three characters, which is why platforms sometimes use one metric instead of the other.

    Question: Can I count characters without spaces?

    Yes, most counters include a toggle to switch between counting with spaces and without spaces. This matters for platforms like SMS messages or certain form fields that calculate limits based only on visible, non-space characters. Switching the toggle updates your total instantly without needing to retype anything.

    Question: Do character counters work for non-English text?

    Yes, character counters work across languages, and they’re especially useful for Japanese, Korean, and Chinese, where character count carries more weight than word count. Each character in these languages holds more meaning than a single Latin letter. Even for other languages, tracking character count still helps with editing and formatting.

    Question: How accurate are online character counters?

    Online character counters are highly accurate because they apply exact, rule-based logic to detect characters, spaces, and word boundaries rather than estimating. Counts update in real time as you edit, so the numbers you see always reflect your current draft. There’s no rounding or approximation involved in the calculation.

  • How to Calculate Mortgage Payments Step by Step

    How to Calculate Mortgage Payments Step by Step

    When you first search how to calculate mortgage payments, the formula can look like something only lenders understand. The good news is that the monthly payment comes from one standard equation that you can run yourself. You set M = P × [r(1 + r)^n / ((1 + r)^n − 1)], where P is your loan amount, r is your monthly interest rate, and n is your number of payments. With those 3 inputs, you can find the principal and interest part of your payment by hand.

    The hard part is less about the math and more about knowing what numbers to plug in. In this guide, we will unpack the formula in plain language, show a worked example, explain what really goes into a full payment, and point to free tools that do the heavy lifting for you. Platforms like Tools Repository collect these calculators in one private, no-signup place so you can test ideas safely. Keep reading to see the steps once, then let tools handle the repetitive work.

    Key takeaways

    • You can calculate mortgage payments with one standard formula. It uses your loan amount, interest rate, and term. Once you learn it, the math feels routine.

    • Real mortgage bills include more than principal and interest. Taxes, homeowners insurance, and mortgage insurance often sit inside the same payment. Knowing that gap helps you avoid sticker shock later.

    • Your down payment, loan term, and interest rate change payment size the most. Small shifts in any of these can change affordability a lot.

    • Free online calculators run the same formula that lenders use. They give instant answers without spreadsheets, and good ones keep your data inside your browser.

    “Do the math before you fall in love with a house, not after.”
    — Liz Weston, personal finance columnist

    Table of Contents

    How do you calculate a mortgage payment by hand?

    To calculate a monthly mortgage payment by hand, you use the standard amortization formula with your loan details. That formula spreads your loan balance and interest across equal monthly payments so the amount you pay each month stays the same. Once you know the structure, you can work it out with a basic calculator or even in a notebook.

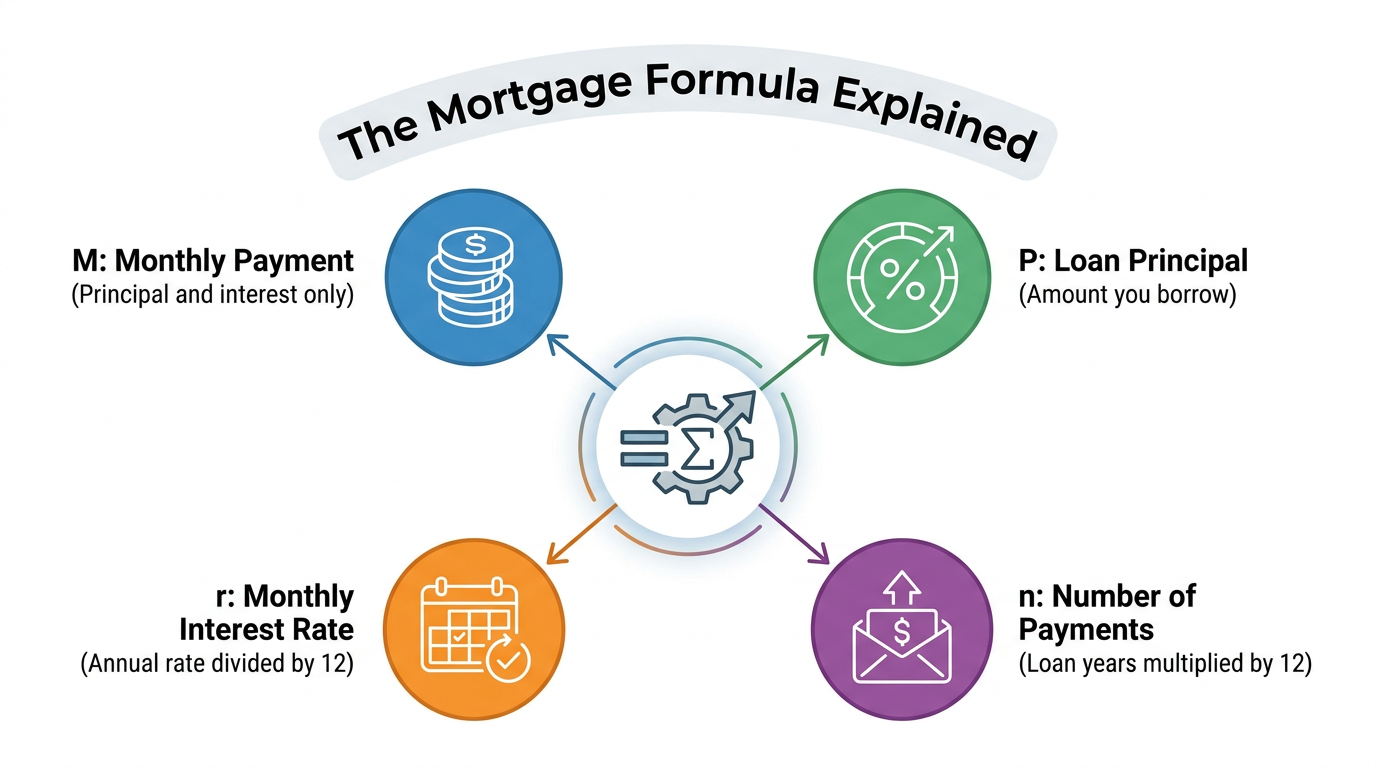
    The mortgage payment formula explained

    Infographic breaking down the mortgage payment formula variables

    The core mortgage payment formula is:

    M = P × [r(1 + r)^n / ((1 + r)^n − 1)]

    Here:

    • M is your monthly payment for principal and interest

    • P is the loan principal

    • r is the monthly interest rate

    • n is the total number of monthly payments

    It looks dense at first, but each piece comes straight from your loan quote.

    To convert your annual rate into a monthly rate, you divide by 12, a step rooted in standard interest rate market pricing and compounding conventions that lenders rely on to structure amortizing loans. If your rate is 6 percent, r = 0.06 ÷ 12, which equals 0.005. To find n, you take the years in your term and multiply by 12. A 30‑year mortgage has 360 payments, while a 15‑year mortgage has 180 payments.

    Inside the brackets, you:

    1. Raise (1 + r) to the power of n

    2. Multiply that result by r

    3. Divide by the same power minus 1

    That fraction is the payment factor. When you multiply the factor by your principal P, you get the monthly payment that will pay the loan down to zero on the last scheduled month.

    Tip: Write the formula on a notecard or save it in your phone. Once you use it a few times, it starts to feel familiar rather than scary.

    A quick worked example

    Say you borrow 300,000 dollars at 6 percent interest for 30 years. Here P = 300000, the annual rate is 0.06, r = 0.06 ÷ 12 = 0.005, and n = 30 × 12 = 360. Those 3 numbers completely describe the loan.

    Step by step:

    1. Calculate (1 + r)^n, which is (1.005)^360

      • On a scientific calculator, you get roughly 6.0226

    2. Multiply that by r

      • 0.005 × 6.0226 ≈ 0.0301

    3. Subtract 1 from 6.0226 to get the denominator

      • 6.0226 − 1 = 5.0226

    4. Divide 0.0301 by 5.0226

      • 0.0301 ÷ 5.0226 ≈ 0.00599

    That 0.00599 is your payment factor. Now multiply by the principal:

    • 0.00599 × 300000 ≈ 1797 per month

    That is the principal and interest part of the payment only, not taxes or insurance. Tools like the Loan EMI Calculator on Tools Repository run this same math in milliseconds and show a full payment breakdown so you do not have to repeat these steps by hand every time.

    What actually makes up your monthly mortgage payment?

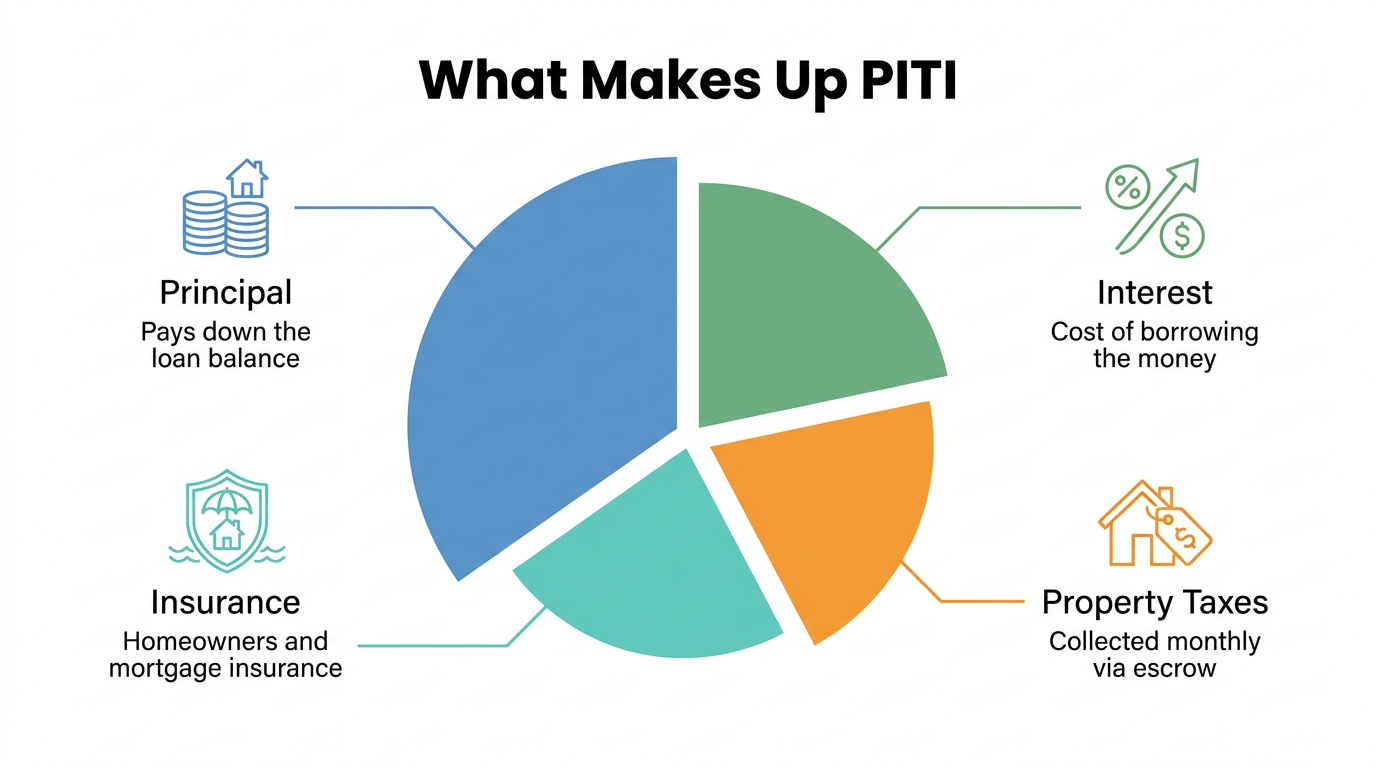
    Infographic showing PITI mortgage payment components

    Your monthly mortgage payment usually includes more pieces than the pure formula suggests. Lenders like to bundle several housing costs into one payment because it lowers the chance that taxes or insurance fall behind. The common label for this bundle is PITI, which stands for principal, interest, taxes, and insurance.

    Think of your payment as four main parts:

    • Principal

    • Interest

    • Property taxes

    • Insurance (homeowners and, when needed, mortgage insurance)

    Principal and interest

    Principal is the amount you borrow to buy the home, after subtracting your down payment. If the purchase price is 400,000 dollars and you put down 80,000, your starting principal is 320,000. Interest is the price you pay the lender for using that money.

    On a standard fixed‑rate loan:

    • Your total payment stays the same each month

    • The mix of principal and interest inside that payment changes over time

    At the start, most of each payment goes toward interest and only a small slice cuts the balance. Over time, more of each payment goes toward principal and your equity grows faster.

    “With an amortizing loan, time is on your side. The more months you survive, the more principal you pay.”
    — J.L. Collins, The Simple Path to Wealth (paraphrased)

    Mortgage insurance (PMI)

    Private mortgage insurance, or PMI, applies when your down payment is under 20 percent on most conventional loans, a threshold tied to loan-to-value ratios that researchers studying urbanization and excess mortgage risk have shown to meaningfully affect default exposure in housing markets. In that case your loan‑to‑value ratio is above 80 percent, and the lender wants extra protection in case you stop paying. PMI protects the lender, not you, but you still pay for it.

    Typical PMI costs run from about 0.46 percent to 1.50 percent of the loan amount per year, depending on credit score and loan type. To estimate a monthly PMI charge:

    1. Pick a rate inside that range

    2. Multiply it by your loan amount

    3. Divide by 12

    For example, on a 250,000 loan at a 0.8 percent PMI rate, you pay about 2,000 per year, or roughly 167 per month.

    Government‑backed programs treat mortgage insurance differently:

    • FHA loans use their own upfront and annual premiums, often for the full term, depending on down payment

    • VA loans for service members skip PMI but use a funding fee instead

    • Many USDA loans for rural buyers follow a similar pattern with their own fee structure

    Taxes, insurance, and escrow

    Property taxes are local charges based on your home’s assessed value, and they fund schools, roads, and other public services. A common rough estimate is 1 percent to 1.25 percent of the home value per year, though some areas are lower and some are much higher. To fit that into a monthly budget, you take the yearly estimate and divide by 12.

    Homeowners insurance protects the structure and your belongings from fire, theft, and other named losses. Many policies cost less than 1 percent of the home price each year, but the exact premium depends on coverage level, location, and claim history. Your lender almost always wants the insurance payment collected monthly and held in an escrow account.

    If you live in a condo or planned community, you may also pay homeowners association dues. HOA fees are not part of the official debt‑to‑income ratio that underwriters at Fannie Mae or Freddie Mac calculate, but they still affect how much home truly fits your budget. When your lender manages escrow, it adds estimated taxes, insurance, and sometimes HOA costs to the principal and interest payment so everything gets paid on time.

    Tip: When you compare homes, compare the total monthly cost, not just principal and interest. Taxes, insurance, and HOA fees can make two similar‑priced houses feel very different.

    Which inputs change your mortgage payment the most?

    The inputs that change your mortgage payment the most are your down payment, loan term, and interest rate. You have some control over all three by saving more, choosing a different term, or improving your credit and shopping among lenders. Understanding how each knob works lets you shape a payment that matches your comfort level.

    Down payment and loan term

    Infographic comparing 30-year versus 15-year mortgage terms

    Your down payment directly decides how much you borrow and whether PMI applies. Many conventional loans allow as little as 3 percent down, FHA loans often start at 3.5 percent, and some VA or USDA loans can go as low as zero down for eligible borrowers. A 20 percent down payment is not required, but it usually removes PMI and leads to lower monthly costs.

    Loan term controls how long you spread those payments:

    • A 30‑year term gives you the smallest monthly payment for a given rate and principal, which is why it is the most common choice in the United States

    • A 15‑year term trims the total interest a lot but raises the monthly bill because you clear the balance in half the time

    Imagine that same 300,000 loan at 6 percent interest:

    • Over 30 years the principal and interest payment is around 1,800 per month

    • Over 15 years the monthly payment jumps well above 2,500

    • The total interest across the life of the loan falls by many tens of thousands with the shorter term

    The right choice depends on your income, savings plans, and how steady your cash flow feels. Some borrowers split the difference by taking a 30‑year loan but paying a bit extra each month as if it were a 20‑ or 25‑year term.

    Interest rate and credit score

    Your interest rate sets the slope of the entire payment stream, so every fraction of a percent matters. A move from 6.0 percent to 6.5 percent can add more than 100 dollars per month on a typical 300,000 loan. Over decades, that extra payment adds up to tens of thousands of extra interest dollars.

    Lenders base the rate they offer on your credit profile, your down payment, the loan type, and your property’s ZIP code. Strong credit scores can lead to better pricing through conventional lenders or programs backed by FHA, VA, or USDA. Comparing quotes from several lenders or marketplaces like Bankrate or NerdWallet can expose rate differences that matter much more than a slightly higher home price.

    Simple ways to aim for a better rate include:

    • Paying all bills on time for many months before applying

    • Reducing credit card balances to lower your credit utilization

    • Avoiding new credit accounts right before your mortgage application

    Sample payments by home price

    To put some numbers to these ideas, here is an example table. It shows estimated monthly payments for a 30‑year fixed loan at 7 percent interest with 15 percent down, including rough estimates of PMI, property taxes, and homeowners insurance.

    House priceMortgage amountEstimated monthly payment
    100,00085,000566
    200,000170,0001,016
    300,000255,0001,603
    400,000340,0002,138
    500,000425,0002,702
    600,000510,0003,619
    700,000595,0004,222
    800,000680,0004,825

    Your own payment will differ based on local taxes, exact rate, and insurance quotes, but the pattern is clear. As home price and loan size rise, the payment scales quickly, which is why down payment size and rate shopping matter so much.

    “When you’re stretching for a house, don’t just ask ‘Can I qualify?’ Ask ‘Will this still feel comfortable if life throws me a curveball?’”
    — Ramit Sethi, personal finance author (paraphrased)

    How can you skip the manual math?

    Couple reviewing mortgage payment budget at home together

    You skip the manual mortgage math by using calculators that run the same formula for you. Once you understand what the variables mean, a good calculator saves time, reduces slipups, and makes it easy to compare many what‑if cases. That frees you to focus on planning instead of punching numbers.

    Tools that do the math for you

    Infographic of free mortgage calculator tools available online

    Online mortgage calculators use the amortization formula under the hood, just like banks. You type in the loan amount, interest rate, and term, and they return the monthly principal and interest, plus totals over the full term. Many also accept estimates for property taxes, homeowners insurance, PMI, and HOA dues so you see a realistic monthly number.

    Tools Repository groups several helpful calculators in one clean place. Its Loan EMI Calculator gives instant payment breakdowns for mortgages and other installment loans. The Mortgage Payoff Calculator shows how extra payments each month or each year can shorten your term and cut interest. A Savings Goal Calculator helps you plan a down payment target and see how long different savings rates will take.

    These tools run inside your browser, so your loan amounts and income figures are not sent to a remote server. There is no login wall, no subscription, and no personal data requirement, which works well for privacy‑minded developers, students, and freelancers. Once you trust that the formulas match what lenders use, you can rely on calculators to handle most future questions with a few quick changes to the inputs.

    Tip: Save a few sample scenarios inside a spreadsheet or notebook. Then when rates move or your budget changes, you can quickly update just one or two numbers and compare.

    A note on debt-to-income ratio

    Your debt‑to‑income ratio, or DTI, answers how much house payment you can afford on paper. You calculate it by taking your total monthly debt payments and dividing by your gross monthly income before taxes. The result, written as a percent, is a key number lenders use when they review applications.

    A common rule of thumb, often called the 28/36 rule, says housing costs should stay near 28 percent of your gross income, and all debt, including the mortgage, should stay near 36 percent. For example, if you earn 5,000 per month before tax, many lenders want your full mortgage payment at or below about 1,400.

    A quick way to track DTI:

    • Add up monthly payments on credit cards, auto loans, student loans, and personal loans

    • Add your estimated full mortgage payment (principal, interest, taxes, insurance, and any PMI)

    • Divide that total by your gross monthly income

    Checking DTI before you lock onto a target price can save you from falling for a payment that feels tight once you add real‑life expenses.

    The takeaway

    The takeaway from learning mortgage math is that monthly payments are not magic; they are predictable. Once you know the basic formula for principal and interest and you add taxes, insurance, and any mortgage insurance on top, you can estimate your true payment with confidence. That makes shopping for homes and comparing loans far less stressful.

    You do not have to run the full amortization formula by hand every time you tweak a number. Instead, think of the formula as your mental model and use calculators to handle the heavy computation. Privacy‑friendly tools such as those on Tools Repository give you quick answers without signups or tracking, and a lender can later confirm the figures before you make any binding decision.

    “The more you understand your numbers, the less scary big financial choices feel.”
    — Anonymous homebuyer

    Frequently asked questions

    Question: How do you figure a mortgage payment without a calculator?

    Answer: You figure a mortgage payment by using the standard amortization formula M = P × [r(1 + r)^n / ((1 + r)^n − 1)]. Convert the annual rate to a monthly rate, count your total number of payments, then follow the order of operations step by step. It takes patience, which is why most people rely on calculators once they understand the structure.

    Question: How much interest will I pay on my mortgage over time?

    Answer: The total interest you pay depends on your loan amount, interest rate, term length, and any extra payments you make. You can estimate it by multiplying your monthly payment by the number of payments, then subtracting the original principal. An amortization schedule or payoff calculator shows this more clearly and lets you see how extra payments shrink the total interest.

    Question: What is a mortgage amortization schedule?

    Answer: A mortgage amortization schedule is a table that shows every payment from your first month to your last. Each row lists how much of that payment goes to interest, how much goes to principal, and what balance remains. Early rows are interest‑heavy, while later rows shift toward principal as you pay the loan down.

    Question: How to calculate home loan payments with taxes and insurance included?

    Answer: You start with the principal and interest payment from the amortization formula. Then you add monthly estimates for property taxes, homeowners insurance, and any PMI or HOA dues. For taxes and insurance, take the yearly amounts and divide by 12. Many Auto Loan Calculator let you enter these extra items directly so the full payment appears in one number.

    Question: How much down payment do I need for a house?

    Answer: Many conventional loans accept down payments as low as 3 percent, while FHA loans often start around 3.5 percent. VA and USDA programs can allow zero percent down for eligible buyers. A 20 percent down payment is helpful because it usually removes PMI and lowers monthly cost, but it is not a hard requirement.

    Question: Can extra payments really shorten my mortgage?

    Answer: Yes, extra payments usually go straight toward principal, which reduces future interest charges, an effect examined in research on mortgage curtailment income and substitution effects that looked at how borrowers change extra-payment behavior over time. Even adding a modest amount each month or making one extra payment per year can cut years off a 30‑year schedule. A Mortgage Payoff Calculator shows exactly how much time and interest you save when you increase your payment in different ways.

  • How to Create robots.txt: Step-by-Step Beginner Guide

    How to Create robots.txt: Step-by-Step Beginner Guide

    Table of Contents

    Introduction

    To create a robots.txt file from scratch, open a plain text editor, write a few crawl rules, save the file as robots.txt, upload it to the root of your domain, and test it with a robots.txt checker. Once you understand how to set up robots.txt, search engines can crawl your website with far less risk.

    That small text file controls which pages Google, Bing, Yandex, and other crawlers visit, so mistakes in it can quietly damage search traffic.

    This guide explains robots.txt basics, walks through setup step by step, shows clear examples, and introduces the Tools Repository Robots.txt Generator. Read on so you can avoid common crawler traps.

    Key Takeaways

    • A robots.txt file tells search bots which pages and folders they can visit. It sits in your domain root. Clear rules protect crawl budget and reduce messy indexation.

    • The file must be named robots.txt and placed at mysite.com/robots.txt. Directives like User-agent, Disallow, Allow, and Sitemap guide each crawler. Simple syntax helps you avoid painful mistakes.

    • Always view your file in a browser and test rules with Google Search Console before launch. Regular checks catch tiny errors. The Tools Repository Robots.txt Generator builds safe files in seconds.

    What Is a Robots.txt File and Why Does It Matter for SEO?

    Developer writing robots.txt file in code editor

    A robots.txt file is a small text file at your site root that tells search engines where they may crawl. It matters for SEO because these rules shape how Google, Bing, and other bots discover, load, and judge your content.

    Robots.txt sits at the top level of your domain, at https://yourdomain.com/robots.txt, and it controls crawling for that host only — a dynamic that Market or Markets? Investigating Google’s search structure helps put into broader competitive context. When Googlebot first visits a site, it requests this file before any other URL, according to Google Search Central. If the file is missing, crawlers treat that as full access.

    For SEO, robots.txt acts like a front gate. A clean robots.txt file lets bots spend more time on valuable pages and less on login areas, internal search pages, or endless filter URLs. That focus helps your important content appear in search more often. Research from Ahrefs shows that 90.63 percent of pages get no organic traffic from Google, and weak technical setup is one reason.

    Robots.txt has clear limits though:

    • It cannot hide sensitive data, because anyone can type /robots.txt into a browser and read it.

    • It does not remove a page from search results by itself. If other sites link to a blocked URL, Google may still list that address, just without page content.

    For true removal, you use a noindex tag on the page and allow crawling.

    Here is a quick guide to picking the right method:

    GoalRecommended Approach
    Stop bots from wasting time on low-value pagesAdd suitable Disallow rules in robots.txt
    Remove a page from search resultsAdd a noindex directive on the page and allow crawling
    Keep private content away from everyoneProtect the area with logins, firewalls, or IP restrictions

    Robots.txt Syntax Rules and Core Directives Explained

    Planning robots.txt syntax rules with notebook diagram

    Robots.txt syntax rules describe how you write instructions for crawlers, and the core directives define what each rule means. Once you understand this syntax, you can read or write almost any robots.txt file with confidence.

    Each robots.txt file is made of groups. A group starts with a User-agent line and then one or more rules such as Disallow, Allow, and optional lines like Sitemap or Crawl-delay. Crawlers choose the most specific group that matches their name; for example, Googlebot prefers rules written for Googlebot over rules written for the wildcard *.

    Here is a simple robots.txt file example:

    User-agent: Googlebot
    Disallow: /nogooglebot/
    
    User-agent: *
    Disallow: /admin/
    Allow: /
    
    Sitemap: https://www.example.com/sitemap.xml
    

    The User-agent directive tells which bot a group targets. Common names include Googlebot, bingbot, slurp for Yahoo, yandex, and baiduspider. Wildcard * means all bots.

    Search EngineTypeUser Agent
    GoogleGeneralGooglebot
    BingGeneralbingbot
    YahooGeneralslurp
    YandexGeneralyandex
    BaiduGeneralbaiduspider

    Disallow marks paths that a bot must not crawl. When you write Disallow: /admin/ in a group, that crawler skips every URL that starts with that folder. An empty Disallow line means full access. Disallow: / is the well-known robots.txt disallow all rule, which blocks the entire site.

    Allow lets you open a specific path inside a blocked folder. A classic WordPress pattern looks like this:

    User-agent: *
    Disallow: /wp-admin/
    Allow: /wp-admin/admin-ajax.php
    

    The Sitemap line shares your sitemap location, using a full URL. You can list several sitemaps if your site has many sections. Crawl-delay asks some bots to slow down between hits, though Google Search Central confirms that Google ignores it. Since first-position clicks matter a lot, and Backlinko reports that the top organic result gets about 31.7 percent of all Google clicks, these small syntax details can pay off.

    How to Create and Deploy Your Robots.txt File Step by Step

    Creating and uploading robots.txt file step by step

    This section shows how to create robots.txt from a blank file, place it in the correct spot, and test it. Follow these steps and you will set up a safe, working robots.txt file for your website.

    1. Step 1: Create The File
      Open a plain text editor such as Notepad, TextEdit in plain text mode, VS Code, or Sublime Text. Start a new blank file. Do not use a word processor, because it may add smart quotes or other hidden characters that confuse crawlers. Save the file as robots.txt with UTF-8 encoding on your computer.

    2. Step 2: Write Your Rules
      List which folders and pages you want bots to skip, such as admin panels, login pages, and test areas. Decide which bots need special treatment; for example, you might want one group for Googlebot and another for all others. Then add lines for User-agent, Disallow, Allow, and Sitemap. Here is a tiny robots.txt file example you can adjust:

      User-agent: *
      Disallow: /admin/
      Disallow: /search/
      Sitemap: https://www.example.com/sitemap.xml
      
    3. Step 3: Upload To The Site Root
      Your robots.txt file location must be the top level of the site, not a subfolder. Use cPanel File Manager, FTP, SFTP, or your cloud host dashboard to upload the file into the main web root, often named public_html or www, keeping in mind that research on Behavioral Factors Influencing Local SEO strategy shows proper file placement is a foundational technical signal. When you visit https://yourdomain.com/robots.txt, the file content should appear as plain text. For subdomains, such as blog.example.com, you upload a separate file to that subdomain root.

    4. Step 4: Verify Public Access
      Open a private or incognito browser window so you are not seeing a cached version. Visit your exact robots.txt URL and confirm that every line looks right. Check that there are no stray characters, fancy quotes, or unwanted spaces. If you just added robots.txt to a website for the first time, this simple check catches most early mistakes.

    5. Step 5: Test And Monitor
      Use the robots.txt report inside Google Search Console to see how Googlebot reads your file and which URLs are blocked. That report acts as a handy robots.txt checker, since you can paste sample URLs and see whether they are allowed. You can also test complex files with Google’s open source robots parser before upload. Rerun these checks whenever you update your rules so you do not break crawling by accident.

    Tip: A single line that reads User-agent: * and Disallow: / creates robots.txt disallow all behavior, which blocks every crawler from your site. Always test for that pattern before publishing changes.

    How to Generate a Robots.txt File Instantly With Tools Repository

    Using online robots.txt generator tool in browser

    This section explains how to generate a robots.txt file quickly with Tools Repository instead of writing syntax by hand. The idea is simple, and it can save you from copy‑paste errors.

    The Tools Repository Robots.txt Generator at toolsrepository.com is a free, browser-based robots.txt generator tool. You enter basic settings, such as which crawlers to allow, which folders to hide, whether to add crawl delay, and your sitemap URL. While you type, the tool builds a clean robots.txt preview in real time that you can copy straight into your file.

    Everything in Tools Repository runs in your browser, so website details never leave your machine — an important consideration given that An Open Letter to SEO tool vendors highlights growing concerns about how tools handle sensitive site data. That privacy-first design helps freelance developers, agencies, and students who work with confidential projects. Site owners also like that the generator output follows common robots.txt rules explained in this guide, which makes it easy to understand and adjust later.

    • Tools Repository keeps the Robots.txt Generator one hundred percent free, with no paid tiers or feature locks. Freelancers, hobby site owners, and large teams all get the same version. You do not create an account and you do not see signup walls, which keeps the workflow smooth.

    • The generator is fully client-side and stores nothing on Tools Repository servers. You can safely add internal paths or staging URLs while testing your robots.txt file, because the data stays inside your browser tab. That fits well with teams that care deeply about security and privacy.

    • The interface works nicely on phones, tablets, and desktops. Alongside the generator, Tools Repository also offers a Meta Tag Generator and over one hundred other tools for SEO, code formatting, and data conversion, all inside a single clean dashboard.

    Critical Robots.txt Mistakes to Avoid and SEO Best Practices

    Critical robots.txt mistakes warning sign close-up

    This section highlights the biggest robots.txt mistakes to avoid and shares robots.txt best practices you can follow every time. Treat it as a short robots.txt SEO tutorial to review before editing your file.

    Common mistakes include:

    • Blocking CSS or JavaScript folders. Google now renders pages with a headless Chrome engine, and Google Search Central warns that blocked resources can lead to poor rendering and weaker rankings.

    • Using robots.txt as a security shield, even for areas like admin panels or private reports. Since the file is public and bad bots often ignore it, you always pair it with real authentication — a finding reinforced by evidence that Scrapers selectively respect robots.txt directives, meaning malicious crawlers frequently bypass these rules entirely.

    • Confusing crawling and indexing. When you block a URL path, Google may still index that address if other sites link to it, although the result will show little detail — a nuance that Artifact: Odyssey of robots.txt governance research examines closely in the context of LLM web crawling compliance.

    • Forgetting to retest files after quick edits. This is how accidental global blocks such as Disallow: / end up on live servers. According to Internet Live Stats, Google processes billions of searches every day, so even short outages can cost real traffic.

    Tip: Before changing robots.txt on a live site, keep a copy of the previous version. If something goes wrong, you can restore the old file in seconds.

    Robots.txt best practices are simple:

    • Block only low-value areas such as admin pages, internal search results, and endless filter combinations. Let crawlers reach normal content, CSS, and JavaScript so they can see pages the way users see them.

    • Always include a Sitemap line that points to your XML sitemap, because that helps bots find your main pages quickly. Keep rules short and clear, and avoid clever patterns that are hard to debug later.

    • After each change, view the file in a browser and retest it inside Google Search Console. Save a backup of the previous version so you can roll back fast if a problem appears.

    Wrapping Up

    A well written robots.txt file gives search engines a clear path through your site while keeping them out of cluttered or sensitive areas. You now know what the file does, how its syntax works, how to create robots.txt step by step, and how to avoid the most damaging mistakes.

    When you want a ready-to-use file in seconds, the Tools Repository Robots.txt Generator offers a fast, free, and private shortcut. Open it, set a few options, copy the output, and your next robots.txt update is ready to publish.

    Frequently Asked Questions

    Question 1: Where Exactly Should The Robots.txt File Be Located On My Website?

    The robots.txt file must live at the root of your site, such as https://yourdomain.com/robots.txt. It cannot sit in a subfolder. The rules there apply only to that exact protocol, host, and port, so each subdomain needs its own file.

    Question 2: Does Robots.txt Affect My Website’s Google Rankings?

    Robots.txt affects rankings indirectly. If it blocks key pages or resources like CSS and JavaScript, Google cannot crawl or render them well, which may lower visibility. Smart rules that hide only low-value pages can protect crawl budget, but the file alone does not push rankings upward.

    Question 3: Can I Have More Than One Robots.txt File On My Site?

    You can have only one robots.txt file per host, which means one file for each protocol, domain, and port combination. However, separate subdomains such as shop.example.com and blog.example.com each need their own robots.txt file at their own root.

    Question 4: How Do I Block Only One Specific Search Engine Bot?

    To block a single crawler, create a group that names that bot in the User-agent line and add Disallow rules under it. For example, you might have one group for bingbot and leave another group for all other crawlers untouched so they keep normal access.

    Question 5: How Often Do Search Engines Re-Read My Robots.txt File?

    Search engines cache robots.txt and re-read it several times per day, especially on active sites. When you make an urgent change, you can ask Google to fetch the file again through Google Search Console so new rules apply more quickly.

  • Secure Random String Generator for Tokens & Keys

    Secure Random String Generator for Tokens & Keys

    Needing secure strings for tokens, keys, or passwords and then hitting sign-up walls feels like wasted time. The simplest answer is to use a trusted, browser-based random string generator that runs fully on your device. Tools Repository’s Random String Generator does exactly that, with cryptographically secure randomness, no account, and no tracking at all.

    A random string generator builds unpredictable codes from letters, digits, and sometimes symbols, so you can create API keys, session IDs, promo codes, and test data in seconds. With Tools Repository you open the page, set length and character set, click once, and you’re done. Everything stays in the browser, which keeps sensitive values away from remote servers.

    This guide walks through what random strings are, who uses them, how to generate a random string online with Tools Repository, when to write code instead, and which mistakes to avoid. Ready for faster, safer strings without signup friction? Keep reading.

    Key Takeaways

    • A random string generator creates short or long codes from characters you choose. You use it for IDs, tokens, passwords, and placeholders. It replaces manual typing with quick, repeatable output.

    • Pseudo‑random strings use basic generators such as JavaScript Math.random. Cryptographically secure strings rely on sources such as the Web Crypto API. The second group resists guessing much better and suits secrets.

    • Common needs include session tokens, API keys, test data, and placeholder content for layouts. Random text also helps with coupon codes, raffle tickets, and reference numbers. One simple tool can support all these workflows.

    • Browser‑first generators that run entirely on the client keep secret values off third‑party servers. That design improves privacy for security strings and removes legal worries around storage of tokens.

    • Tools Repository delivers instant results with no login and no tracking. The Random String Generator uses a CSPRNG in the browser for strong output. It lives beside other free tools such as a Password Generator and SHA‑256 Hash Generator.

    Table of Contents

    What Is a Random String Generator and Why Do You Need One?

    Developer generating secure API keys on mechanical keyboard

    A random string generator is a small tool or function that builds unpredictable character sequences from a chosen alphabet. Each character comes from sets such as A–Z, a–z, digits, and optional symbols. The result behaves like a code you can paste into software, databases, or documents.

    In real work these strings stand in for IDs, tokens, temporary passwords, and many kinds of placeholders. Instead of inventing values by hand, you can create random string output that avoids patterns and repeats. That saves time and also reduces the chance that two users share the same identifier.

    Behind the scenes there are two broad classes of randomness:

    • Pseudo‑random generators (such as JavaScript Math.random) use formulas that appear random but follow internal state.

    • Cryptographically secure generators (often called CSPRNGs) use system entropy and strict rules so attackers cannot predict future values.

    According to OWASP, security tokens should always come from cryptographically strong sources, not from simple PRNGs.

    Entropy—how many different strings your setup can produce—matters a lot. With 62 possible characters and a length of 5, you already reach 62⁵, about 916 million possible values, as explained in guides for the entropy-string library. Longer strings grow that space fast, which sharply lowers collision odds — a principle explored in depth by recent work on Scalable Precise Computation of Shannon entropy in combinatorial settings. Tools Repository leans on this idea and lets you choose both length and alphabet to match your risk level.

    Who Uses Random String Generators? Real-World Use Cases

    Diverse team using online string generator tools for projects

    Random string generators support far more than back‑end code. Anyone who needs distinct looking text snippets can use them for daily tasks. Developers, designers, students, and small teams all depend on these little helpers.

    Here is how different groups typically use an online random string generator such as the one on Tools Repository.

    AudienceCommon Use Cases
    Web DevelopersSession tokens, API keys, CSRF tokens, unique database IDs
    UI and UX DesignersPlaceholder labels for mockups, component IDs in design systems, sample data for prototypes
    Students and ResearchersSample datasets, probability experiments, synthetic records for homework or demos
    Content WritersPromo codes, URL slugs, raffle ticket IDs, invoice references inside articles or campaigns
    Freelancers and Small Business OwnersDiscount codes, verification links, temporary login credentials for clients

    For web developers, a fast way to create random API key candidates, CSRF tokens, or one‑time links removes plenty of friction. According to MDN Web Docs, modern browsers expose secure crypto APIs, so these values can reach strong randomness even without server help. That gives front‑end engineers a simple path to better security.

    Designers and digital creators rely on realistic filler data rather than the same lorem ipsum line. Tools Repository can create random string batches that feel closer to real identifiers, which keeps high‑fidelity layouts clean. Students, content writers, and business owners also gain quick, repeatable codes without touching command lines or scripts. One simple, free string generator tool ends up in many bookmarks.

    How to Generate a Random String Online With Tools Repository

    Using browser-based random string generator tool online

    The easiest way to generate string output for keys, IDs, or test data is to use Tools Repository in your browser. This section shows every step so you can go from zero to copy‑ready string in seconds. No signup, no extension, no extra app.

    1. Open the Random String Generator Page

      Start with the Random String Generator page on Tools Repository. Any modern browser such as Chrome, Firefox, Edge, or Safari will work on desktop or mobile. You land on a clean screen with length and character set controls front and center.

    2. Choose Length and Character Set

      Next, pick how long the output should be.

      • Short values around 6–8 characters suit quick labels or slugs.

      • Longer values around 16–32 characters fit random token generator use cases or session IDs.

      You can keep it numeric, alphabetic, alphanumeric, or include extra symbols for more entropy.

    3. Generate and Copy Your String

      Then click the Generate button to create random string output in real time. The tool uses the Web Crypto API behind the scenes, which MDN Web Docs lists as a cryptographically strong random source on the web. The value appears instantly without a page reload. One more click copies it into your clipboard, ready for your editor, Postman collection, or database shell.

    4. Keep Your Strings Local and Private

      A key detail is privacy. Tools Repository runs this logic entirely on the client, so strings never leave your device. According to NIST, local generation removes a whole set of exposure risks from network paths. The platform also stays open source, free, and free from tracking. If you later need a random password generator, hash output, a random number, or a quick robots.txt, those tools sit in the same minimal interface.

    JavaScript vs. Online Tools: Which Should You Use to Generate Random Strings?

    Comparing JavaScript code versus online string generator tools

    Choosing between custom code and an online random string generator depends on how often and where you need strings. Developers may prefer in‑code functions, while many people just want a quick browser tool. This section breaks down those trade‑offs.

    When you expect to call string logic from inside an app, native code makes sense. For JavaScript in the browser, a simple loop over a character set with Math.random works for basic tests, placeholders, or slugs.

    “Math.random() does not provide cryptographically secure random numbers.”
    — MDN Web Docs

    Because of that, Math.random should not back tokens or passwords.

    For security work you should use the Web Crypto API in the browser or the crypto module in Node.js. These APIs hook into the operating system entropy pool and pass strict checks from standards groups such as NIST. Python users reach for the secrets module to generate strong string values on the server side. In each case the idea stays the same, but the call style fits the language.

    If you just need to create random string batches by hand, code adds overhead. Here is a simple rule of thumb that also covers people who do not code:

    ScenarioRecommended Approach
    One‑off string with no scriptOnline tool such as Tools Repository
    JavaScript generate random string for test dataMath.random with a clear character set loop
    Generate random API key or token in productionWeb Crypto API, Node.js crypto, or Python secrets module
    Huge batch or automationLanguage‑specific loop or an entropy‑aware library such as entropy-string

    Tools Repository sits in that first row. It works well when you want fast, safe strings by hand or during quick testing, without opening an IDE or touching GitHub.

    Common Mistakes to Avoid When Generating Random Strings

    Security padlock symbolizing common random string generation mistakes

    Random string tools feel simple, yet a few choices can weaken security or break uniqueness promises. Knowing these mistakes helps you pick better defaults, even when you just click a button in the browser. Here are pitfalls worth avoiding.

    • Using Math.random for secrets
      Many people use Math.random for secrets such as password reset links or API keys. This function is fine for mock data, but it does not give strong protection against prediction. For any secret value, pick a generator that clearly states cryptographic strength, such as Web Crypto in the browser or Node.js crypto.

    • Picking strings that are too short
      Short strings often seem safe because they look random to the eye. The math tells a different story, since collision chances rise fast with volume — a challenge explored in A Review of Methods for string complexity, which quantifies how quickly short sequences become predictable under volume. With a 62‑character alphabet and length of 5, you expect repeats after around 30 thousand strings, as explained by guides on entropy-string. Production IDs should start around 10 or more characters instead.

    • Including confusing characters in human‑typed codes
      Codes that people type by hand can turn messy when they mix similar symbols. Characters such as zero, uppercase O, lowercase l, and digit one confuse users and support staff. For promo codes or activation keys, filter those out so people can read and share values without mistakes.

    • Using server‑side tools that log generated strings
      Some online tools send data to remote servers and possibly log everything — a privacy risk underscored by research on Generating borderline test samples for randomness testers, which highlights how outputs from weak or logged generators can be reverse-engineered. That design conflicts with secret uses such as token creation. A client‑side generator such as the one on Tools Repository keeps all values local, so sensitive strings never cross the network during creation.

    Tip: When you’re unsure which settings to pick, choose a longer string and a wider character set from a cryptographic generator. That simple habit goes a long way toward keeping tokens hard to guess. — Tools Repository Team

    Wrapping Up

    Random strings sit under a surprising amount of digital work, from API keys and CSRF tokens to promo codes and invoice numbers. A good random string generator saves time, improves uniqueness, and raises security when you pick a strong source. Longer values and wider alphabets give better protection.

    For many tasks a free online random string generator is the fastest choice. Tools Repository focuses on that space with a client‑side, CSPRNG‑based tool that needs no account and no setup. When you later need heavy automation, you can switch to Web Crypto, Node.js crypto, or Python secrets. For now, open Tools Repository, set your options, and create safe strings in a couple of clicks.

    Frequently Asked Questions

    Question: What is the safest way to generate a random string for an API key or token?

    The safest approach uses a cryptographically secure generator such as the Web Crypto API in the browser or Node.js crypto.randomBytes. These sources draw from strong entropy, which limits prediction. Tools Repository’s Random String Generator also relies on a CSPRNG and runs fully in the browser, so sensitive strings never reach a remote server.

    Question: How long should a random string be to avoid duplicates?

    Longer strings with rich alphabets cut collision risk far more than short ones. With a 62‑character set, 5 characters give under a billion possible values, so repeats appear quickly, as entropy‑string examples show (entropy-string). For production IDs, aim for at least 10 characters and use entropy‑aware libraries for very large datasets.

    Question: Can I generate a random alphanumeric string without writing code?

    Yes, you can generate a random alphanumeric string in the browser with no code at all. Tools Repository’s online random string generator lets you pick length and character set, then create output with a single click. It runs instantly, needs no installation, and suits both technical and non‑technical users.

    Question: Is it safe to use an online random string generator for passwords?

    It can be safe when the tool runs client‑side and uses cryptographically secure randomness. Tools that send data to servers may log output, which is risky for passwords. Tools Repository keeps all password and string generation inside the browser and also offers a dedicated Password Generator built on the same privacy model.

    Question: What characters should I include in a random string for maximum security?

    For strong security include uppercase letters, lowercase letters, digits, and a set of special symbols. This wide alphabet increases entropy for each character position. When people must type the code by hand, you can remove confusing symbols such as zero and uppercase O. A longer random string with a broad set gives far better resistance against guessing.

  • Km to Steps Calculator: Convert Distance to Steps

    Km to Steps Calculator: Convert Distance to Steps

    Table of Contents

    Introduction

    Turning a distance in kilometers into a clear step count often feels like guesswork across apps. Different trackers use different assumptions, so totals rarely match. For a fast, free km to steps calculator, Tools Repository’s browser-based Steps to Km Converter gives accurate, private results instantly in your window.

    This tool turns any distance into a personalized step estimate using stride formulas from exercise science instead of one fixed number. It helps answer questions such as:

    • How many steps are in a kilometer?

    • What does 10,000 steps really mean in distance?

    • How do your own height and pace change the totals?

    You can also flip step counts back into kilometers when your watch only shows steps.

    Keep reading for quick reference tables, simple rules of thumb, and a no sign-up converter that runs completely on your device.

    Key Takeaways

    Before looking at formulas and tables, it helps to anchor a few simple ideas. These points keep every later calculation in perspective.

    • Conversion between kilometers and steps is personal. Pace changes the count a lot, and height and biological sex shift stride length.

    • Average walking speed gives about 1,408 steps per kilometer. That figure comes from lab-based research. Your own result will sit somewhere around it.

    • 10,000 steps usually equals six to eight kilometers. Faster movement stretches each step out; slower walking shrinks the distance.

    • Tools Repository offers a steps and distance converter that works in real time. It updates as you type, with no login, tracking, or server storage.

    • Both km to steps and steps to km views matter. One helps when you plan routes by distance; the other helps when devices only store step totals.

    “What gets measured gets managed.” — Peter Drucker

    If you can turn distance into steps (and back again) quickly, it becomes much easier to track real progress instead of just guessing.

    What Is a Km to Steps Calculator and How Does It Work?

    Person walking briskly on sunlit park path

    A km to steps calculator is an online tool that turns any distance in kilometers into an estimated number of steps. The stronger versions, such as Tools Repository’s Steps to Km Converter, use details like height, biological sex, and pace to shape that estimate. This gives a much closer picture than a single average number for everyone.

    Most people meet step counts through a smartwatch or pedometer from brands such as Fitbit, Apple Watch, or Garmin. Those devices record each step directly but may not show distance very clearly. On the other side, apps like Strava, MapMyRun, or Google Maps talk in kilometers or miles, not steps. A solid calculator connects these views so activity data lines up.

    Research from the Centers for Disease Control and Prevention notes that adults should aim for at least 150 minutes of moderate activity each week. Many people track that time through steps, so having a reliable distance-to-steps converter helps them judge progress. Instead of wondering whether a 3 km walk meets part of that target, a calculator shows roughly how many steps it represents for their body.

    A good km to steps calculator usually asks for a few core inputs after you type the distance:

    • Biological sex affects average stride length. On average, men of the same height take slightly longer strides than women, so they record fewer steps per kilometer.

    • Height is strongly linked with leg length. Taller people often need fewer steps to cover a kilometer, while shorter people take more, even at the same speed.

    • Pace or speed changes how far each step travels. A slow stroll creates many small steps, while a fast run stretches each stride, cutting the step count.

    • Some tools also accept body weight when you want calorie estimates based on distance, speed, and time.

    Tools Repository processes these details in its Steps to Km Converter right in the browser using JavaScript. All math stays client-side, so no physical measurements, step counts, or identifiers ever leave the page. That local processing lines up well with the privacy goals many users now share.

    Tip: When you first use a calculator, match the output with a known walk or run from your smartwatch. If the numbers look close, you can trust it for quick planning later on.

    How Many Steps Are in a Km? The Science of Stride Length

    Measuring tape and running shoes for stride length

    The number of steps in a single kilometer usually falls between about 875 and 1,408, depending mainly on stride length and speed. Put simply, slower walkers take more, shorter steps, while faster runners take fewer, longer steps. So the answer is a range, not a single fixed value.

    According to data summarized in ACSM’s Health & Fitness Journal, adults walking at around 5 kph take roughly 1,408 steps per kilometer on average, a figure supported by research on Frontiers | Step cadence and its relationship to physical activity intensity. The same research from the American College of Sports Medicine shows that running at about 12 kph drops this to roughly 875 steps. Those results came from controlled treadmill testing on adults of normal weight.

    Stride length sits at the center of this pattern. In measurement work, a “step” is usually treated as half a full stride. A common engineering baseline is a 0.762 meter step length, which is about 2.5 feet. Using that constant, one kilometer becomes about 1,312 steps. The International System of Units treats that as a handy fixed standard, but real people rarely walk exactly like that.

    Several factors pull your own stride away from the textbook value:

    • Height shapes natural step size. Someone who is 6’3″ will almost always cover more ground per step than a person who is 5’1″, even on the same flat street in New York City.

    • Biological sex affects limb proportions and gait. Men often record slightly longer strides than women of equal height, which shows up as fewer steps per kilometer at shared speeds.

    • Pace changes joint angles and contact time. As your speed rises from gentle walk to brisk walk to jog, each step tends to stretch out, so the step count per kilometer falls.

    • Weight and fitness level play quieter roles. Heavier individuals or people returning from injury sometimes use shorter, cautious steps, which pushes the count upward a bit.

    The World Health Organization highlights regular walking and running as practical ways to reach weekly activity targets. Knowing that around 1,400 steps per kilometer is a solid walking average, and that running usually sits between 900 and 1,100 steps, helps place those activities in a concrete frame. Tools Repository uses numbers from sources like ACSM and the Compendium of Physical Activities to keep its stride formulas grounded in published research, consistent with findings on the accuracy and reliability of accelerometer-based pedometers across walking, running, and stair-climbing activities.

    If you want to estimate your stride length without a device:

    1. Measure a straight 20-meter or 50-foot path.

    2. Walk it at your normal pace, counting every step.

    3. Divide the total distance by your step count to get average step length.

    4. Use that number in a km to steps calculator for a closer personal match.

    Km to Steps Conversion Reference Table

    This km to steps conversion reference table shows how research-based averages play out across common distances and paces. The step counts blend male and female results from the ACSM-linked study into single midpoints.

    Distance kmAverage Walk 5 kphBrisk Walk 6.5 kphRun 9.5 kphFast Run 12 kph
    11,4081,2091,045875
    22,8162,4182,0901,750
    34,2243,6273,1352,625
    57,0406,0455,2254,375
    1014,08012,09010,4508,750
    1521,12018,13515,67513,125
    2028,16024,18020,90017,500
    2535,20030,22526,12521,875

    For a fixed stride baseline using 0.762 meters, one kilometer equals about 1,312 steps, so ten kilometers equals about 13,123 steps. Your own results from a km to steps calculator will fall near these values but rarely match them exactly.

    How Far Is 10,000 Steps in Km? Reverse Conversions Explained

    Jogger with smartwatch tracking steps and distance

    Ten thousand daily steps usually work out to roughly six to eight kilometers, depending on how quickly someone moves. Once again, stride length and pace explain most of the variation. Slower walkers cover less ground per step, while brisk walkers and runners cover more.

    Using the ACSM averages:

    • 10,000 steps at a relaxed walking speed of 5 kph map to about 7.1 kilometers.

    • At a brisk 6.5 kph walk, the same 10,000 steps equal about 8.3 kilometers.

    • At a running pace of 9.5 kph, those steps spread over about 9.6 kilometers.

    These figures match the rough “six to eight kilometers” rule many coaches use when they speak about that classic step goal.

    Here is a smaller reverse conversion table to show how steps translate into distance for different walking or running styles.

    StepsAverage Walk 5 kphBrisk Walk 6.5 kphRun 9.5 kph
    1,0000.7 km0.8 km1.0 km
    5,0003.6 km4.1 km4.8 km
    10,0007.1 km8.3 km9.6 km

    You can see why people who jog with Strava or Nike Run Club sometimes record fewer steps than friends who walk with a Fitbit or Samsung Health app, a discrepancy examined in studies on associations of daily step count with health outcomes in large adult populations. A runner at 12 kph might finish a 10 km route with about 8,750 steps, while a slower walker at 5 kph needs about 14,080 steps over the same path. Yet the runner likely spends less time and gains stronger cardiovascular stress during that session.

    Research shared by Harvard Health Publishing notes that health gains start well below 10,000 steps and rise steadily as daily movement increases, a pattern also documented in the Effects of the ‘10,000 Steps Duesseldorf’ community intervention promoting physical activity in adults. The key message is that step count is just one yardstick. Distance, pace, hills, and even surface all matter for heart and lung benefits.

    For planning, 10,000 steps as six to eight kilometers works nicely. Commuters in cities like Chicago or San Francisco can check how much of that target they already cover during daily walks to transit. A distance to steps converter, such as the one from Tools Repository, then helps turn a known route length from Google Maps into either a total step goal or a check against what a watch shows.

    Tip: If your watch reports both distance and steps, compare them a few times. If the numbers stay close to these tables, you can use 10,000 steps as a comfortable benchmark for your day.

    Use the Tools Repository Steps to Km Converter for Instant Results

    Smartphone with fitness step tracking app on desk

    Tools Repository’s Steps to Km Converter gives instant km to steps and steps to km results right in the browser. It acts like a specialized km to steps calculator that understands personal stride patterns instead of forcing everyone into one simple average. You enter your details once and get live updates as you adjust distances or step counts.

    On the page, the tool asks for core fields that match what researchers use. You can:

    • Select biological sex

    • Enter height in centimeters or feet and inches

    • Choose a pace category from very slow walk up to very fast run

    • Type either a distance or a step count

    The calculator then shows the matching value in kilometers and miles below. It feels similar to using a pedometer readout, only with more context.

    Behind the scenes, Tools Repository bases the math on formulas also used in medical fields such as BMI and BMR work. Values from the Compendium of Physical Activities inform its pace choices, which keeps estimates in line with studies used by sports scientists and physiotherapists.

    Several small design choices make the tool practical for everyday use:

    • Everything runs client-side in JavaScript, with no requests sent to a server. This keeps height, weight, and step counts completely on your device, which privacy-focused users and developers often prefer.

    • The layout is responsive and clean, so it works well on Android phones, iPhones, tablets, and desktop machines. Web creators who spend their days in Figma, Canva, or VS Code will find that it behaves like a simple web app, not a cluttered landing page.

    • The Steps to Km Converter sits beside other tools such as the Length Converter, Weight Converter, Interval Timer, and BSA Calculator. That makes it easy to handle unit tweaks, workout timing, and body metrics in the same browser tab.

    According to Pew Research Center, about one in five adults in the United States regularly uses a smartwatch or fitness tracker. Those users often juggle data between tools such as Tools Repository, Apple Health, Google Fit, and training platforms like TrainingPeaks. Tools Repository offers a quiet middle layer with more than 100 free utilities ranging from digital data converters to scientific and basic calculators, all without accounts or tracking scripts.

    Start Converting Km to Steps Instantly – No Sign-Up Needed

    Three people walking together showing different stride lengths

    Accurate km to steps conversion depends on your stride length and pace, not a single rule for everyone — a principle reinforced by research on goal setting for WHO guideline adherence, which translates moderate-to-vigorous activity into daily step targets for older adults. Research from groups like the American College of Sports Medicine shows just how wide step counts can swing across the same kilometer.

    Instead of memorizing charts, you can open the Tools Repository Steps to Km Converter whenever you finish a walk or run:

    1. Type in your distance or step count.

    2. Check that your height and pace look right.

    3. Read personalized results in real time.

    No registration, subscription, or email wall stands in the way, and all math stays inside your browser.

    Whether you are testing a new training plan, reconciling smartwatch data, or building a fitness feature into a web project, that simple km to steps calculator will keep your numbers honest.

    Frequently Asked Questions.

    Question: How do I convert km to steps without a calculator?
    You can multiply kilometers by 1,408 for an average walking pace or by 1,312 for a fixed stride baseline. That gives a decent range for most adults. For more precise results that reflect your height and speed, a personalized online tool such as Tools Repository’s Steps to Km Converter is better.

    Question: How many steps is a 5 km walk?
    A 5 km walk at an average 5 kph pace is about 7,040 steps. At a brisk 6.5 kph walk, it is around 6,045 steps. Your own stride length and terrain can nudge those totals slightly higher or lower.

    Question: Is 10,000 steps a day enough exercise?
    Ten thousand steps per day is a handy goal, but it is not a strict medical rule, and research such as the Effects of the ‘10,000 Steps Duesseldorf’ intervention shows that real-world benefits depend heavily on individual activity levels and consistency. The World Health Organization focuses more on weekly minutes and intensity than one number. Higher intensity movement gives stronger heart benefits even with fewer steps, so personal advice from a clinician is best.

    Question: Can I use a km to steps calculator for cycling or bike rides?
    Standard km to steps calculators are built for walking and running, which both involve strides. Cycling does not use steps in the same way, so normal formulas do not apply. Some apps use a bike km to steps calculator-style feature that estimates “equivalent” steps, but that is a separate system.

    Question: Does height affect how many steps I take per kilometer?
    Height changes step count a lot. Taller people usually have longer legs and cover more distance with each step, so they need fewer steps per kilometer. Someone who is 6’5″ will record far fewer steps over one kilometer than a person who is 5’0″ walking at the same speed.

    By combining these rules of thumb with a dedicated tool like Tools Repository’s Steps to Km Converter, you can turn any distance or step count into clear, personal numbers that make day-to-day activity easier to track.

  • CSS Button Generator: Create Better Buttons Fast

    CSS Button Generator: Create Better Buttons Fast

    Styling buttons by hand can eat hours, especially when every page needs fresh call‑to‑action (CTA) designs. For web designers in 2026, one of the fastest free options is to use an online CSS button generator such as the one from Tools Repository. These tools let you design buttons visually and then copy ready HTML and CSS.

    Without help, you juggle gradients, hover states, and responsive sizes while trying not to break layout. One small typo can leave a key button unreadable or unusable. On a busy project, that often leads to:

    • repeated snippets scattered across files

    • small spacing bugs that slip into production

    • buttons that look slightly different on every page

    In this guide, you will learn what a CSS button generator does, which styles you can control visually, and how to build production‑ready buttons in minutes using Tools Repository’s CSS Button Generator. You will also see how color, copy, and accessibility affect clicks, so you can design buttons that feel better and work harder.

    Key Takeaways

    These key points give you a quick snapshot of the guide. Keep them in mind as you decide how to style your next buttons.

    • A CSS button generator lets you design buttons visually and then copy ready HTML and CSS. That shifts effort from low‑level syntax to real design decisions.

    • You can control colors, gradients, fonts, borders, padding, and shadows in one place. Hover settings and gradient options make call to action buttons stand out and support higher click rates.

    • Tools Repository’s CSS Button Generator is free, private, and runs entirely in the browser with no login. The clean output is ready for production use across school, freelance, or client projects.

    • Button choices affect conversions, accessibility, and user trust. Small tweaks to color contrast, wording, and size can produce large gains over time, especially on high‑traffic pages.

    Table of Contents

    What Is a CSS Button Generator and Who Needs It?

    Web designer working on CSS button styles at desk

    A CSS button generator is a browser tool that lets you design buttons visually and then copy ready HTML and CSS. Instead of hand‑writing styles for gradients, borders, and hover states, you adjust simple controls and see every change at once. When the button looks right, you copy the code and paste it straight into your project. No plugins, compilers, or downloads are required.

    This kind of tool helps different groups for different reasons:

    • Front‑end developers and UI designers save time, because they can create a library of buttons without opening a full design suite or rewriting similar CSS from scratch.

    • Students and new coders gain confidence by watching how each control changes the underlying CSS. Moving a slider or color picker and then reviewing the code is a fast way to learn.

    • Freelancers and small business owners get professional‑looking call to action buttons even if they are not CSS experts. They can adjust a few options, copy the snippet, and move on to content or marketing.

    Tools Repository’s CSS Button Generator focuses on this exact workflow. The tool runs inside your browser, shows a live preview, and produces clean, production‑ready snippets. You do not need an account, and the logic runs on the client side, so your button settings stay on your device. For a free, reliable generator in 2026, it gives web designers a simple, safe default choice.

    “Good design is obvious. Great design is transparent.”
    — Joe Sparano

    Alongside Tools Repository, many designers still use Best CSS Button Generator and CSS3 Button Generator for quick presets. Those tools offer large style libraries and have been around for years. Tools Repository adds a modern twist by staying open‑source friendly, privacy conscious, and part of a wider set of browser‑based utilities. You can try several generators side by side and keep whichever output fits your code style best.

    Which CSS Properties Can You Customize With a Button Generator?

    Color palettes and button shape sketches for CSS design

    CSS button generators give you tight control over the visual parts of a button. Instead of editing a stylesheet by hand, you move sliders and pick colors while the preview updates beside the controls. The main knobs cover color, typography, borders, spacing, and states such as hover. Once you know what each one does, you can match most design systems with confidence.

    Tools Repository’s CSS Button Generator exposes all of these settings in a clean layout. You can switch between solid backgrounds and gradient button styles, test hover colors, and adjust shadows until the button feels right. The live preview makes it easy to compare options without opening your editor.

    Here is how the main properties usually break down:

    PropertyWhat You ControlWhy It Matters
    Background and gradientsChoose solid colors or multi‑step gradients for the button surface.Strong contrast and gradient depth help key actions stand out on busy pages.
    Font stylingPick font family, size, weight, letter spacing, and text color for the label.Matching your site typography keeps the interface coherent and easy to scan.
    Border and radiusAdjust border width, color, style, and corner roundness.Rounded corners and outlines change how clickable and modern the button feels.
    PaddingSet space between the label and the edges on each side.Good padding makes buttons large enough to tap while still looking tidy.
    Hover and focus stateDefine colors, gradients, and shadows that appear on hover or focus.Clear hover feedback tells users the element is interactive and confirms their action.

    Many generators, including Tools Repository, also let you tweak:

    • Box shadow for subtle depth or strong “raised” buttons

    • Text shadow for extra contrast on busy backgrounds

    • Border style (solid, dashed, none) for secondary or outline buttons

    Together, these options turn a simple CSS button generator into a capable button designer for the web. Whether you think of it as a button maker or an HTML CSS button generator, the goal stays the same: create buttons that are easy to spot and easy to use.

    Research from Nielsen Norman Group shows that visitors decide in about 10 to 20 seconds whether a page feels useful, and studies on customizable front end design confirm that visual control over UI elements like buttons directly shapes user perception and engagement.

    How to Create a CSS Button in Minutes — Step by Step

    Dual monitor setup showing CSS button generator and code editor

    Creating a CSS button with a generator follows a simple flow. You open the tool, shape the design, then copy and paste the code. The whole process often takes less than a minute once you know your colors and text. Here is how it works in Tools Repository’s CSS Button Generator.

    1. Open the generator.
      Open the CSS Button Generator on the Tools Repository site in your browser. You do not install anything or create an account. Pick a base style or start from the default button, and keep your brand colors or style guide handy.

    2. Set your main styles.
      Use the controls to choose background colors or gradients, pick a font, set border radius, padding, and box shadow, and decide on hover colors. The tool behaves like a CSS button maker online, but every change updates live beside the form. At this stage you can also:

      • adjust font size so longer labels still fit

      • set border width and color for primary vs. secondary buttons

      • save a few reference values (for example, 8px radius for all buttons)

    3. Fine‑tune hover and focus states.

      Preview hover and focus states until the button feels right. You can quickly try different gradient button looks, shadow depths, and text sizes. This gives you fast feedback that would take many save‑and‑refresh cycles by hand. Aim for:

      • a visible but not distracting hover color change

      • a clear focus ring for keyboard users

      • smooth transitions using transition if the generator offers it

    4. Copy and paste the code.
      When you are happy, copy the generated HTML and CSS code. Paste the CSS into your stylesheet and place the HTML snippet where you want the call to action to appear. The output works in personal or commercial projects, so you own the final result. You can also rename the class to match your naming scheme (for example, .btn-primary).

    5. Test inside your project.
      View the page in your browser, resize the window, and try the button on both desktop and mobile. Check that the label stays readable, the hover and focus states work, and the button does not push nearby elements out of place.

    Because the logic runs on the client side, Tools Repository never sees your colors, text, or project structure — an approach aligned with recent work on Optimizing Retrieval-Augmented Generation-Assisted User interface generation, which highlights the importance of data standardization and brand visual consistency in UI tooling. The CSS button generator behaves as a private HTML button style generator that you can open whenever you need a quick, production‑ready control.

    Does the Generated CSS Work With Bootstrap and Other Frameworks?

    Yes, the CSS from Tools Repository’s generator works with Bootstrap, Tailwind, and custom setups. The tool outputs plain HTML and CSS rules, so it behaves more like a framework‑friendly CSS button code generator than a tied template.

    You can:

    • With Bootstrap: target classes such as btn-primary or btn-success and let your new styles override the defaults.

    • With Tailwind: drop the generated CSS under a custom class and combine it with utility classes for spacing or layout.

    • With CMSs and front‑end frameworks: paste the snippet into WordPress themes, React components, Vue single‑file components, or any static site.

    Because the output has no external dependencies, you do not load extra libraries or scripts — a principle reinforced by research into DesignCoder: Hierarchy-aware and self-correcting UI code generation, which demonstrates that clean, self-contained code output is critical for reliable integration across frameworks. That keeps pages lighter and easier to debug.

    Why Button Design Directly Impacts Conversions and User Experience

    Call-to-action buttons on tablet landing page design

    Button design affects both how people feel on a page and how often they take action. A well‑styled control guides the eye, signals safety, and makes the next step obvious. A dull or confusing button does the opposite and quietly hurts conversions.

    Color does a lot of this work. Red often suggests urgency or warning, blue signals trust, green feels like approval, and orange adds friendly energy. With a CSS button generator you can try several palettes in minutes, swapping gradients and solid fills until one fits your brand and still stands out from the background. On top of that, testing a button against a neutral gray background can make it easier to judge whether the color itself has enough contrast.

    Text on the button matters just as much as color. Short labels that start with strong verbs such as Get, Start, or Download set clear expectations. Phrases that describe a benefit, like Get My Free Guide or Save My Seat, usually beat generic words like Submit, because they answer the silent question in a visitor’s mind: “What do I get if I click?” Avoid vague labels such as Click Here or More wherever possible.

    Research from HubSpot shows that personalized calls to action can increase conversion rates by more than double compared with generic ones. When you match sharp copy with a well‑tested style from Tools Repository’s CSS Button Generator, you give each click a better chance to turn into a signup, demo request, or purchase. Simple A/B tests on button color and wording can surface surprisingly strong combinations.

    “Don’t make me think.”
    — Steve Krug, Don’t Make Me Think

    If a visitor has to pause and decode what a button does, that friction shows up in your analytics. Clear buttons, placed near relevant content and styled with care, help people move smoothly through your site.

    Accessibility and Code Quality: What to Check After Generating Your Button

    Accessibility check for CSS button contrast and keyboard focus

    After you copy code from any CSS button generator, it pays to check accessibility and quality before shipping. Good buttons should work for people who use screen readers, keyboards, or small phones, not just for mouse users on a big monitor. Clean CSS also keeps your project easier to maintain.

    Start with color contrast between the label and the background — a concern validated by recent benchmarks on whether generative AI can create accessible web code, which found that automated UI generation tools frequently fall short of meeting established accessibility standards without manual review. WCAG guidelines recommend a minimum contrast ratio of 4.5:1 for normal text, which usually means avoiding pale text on light gradients. According to WebAIM, more than four out of five home pages they tested had low‑contrast problems, so this step matters more than many teams expect.

    Next, look at the markup and focus behavior:

    • Use a real <button> element for actions (such as opening a modal or submitting a form) or a link with a clear href for navigation.

    • Give each control descriptive text instead of only an icon. If you must use an icon‑only button, add an accessible label with aria-label.

    • Make sure you can reach the button with the Tab key and see a visible focus ring, so keyboard users always know where they are.

    • Check that click and keyboard activation both trigger the same behavior.

    Touch target size is another easy win. On mobile, aim for at least 44×44 pixels of clickable area, including padding. You can adjust padding and font size in Tools Repository’s CSS Button Generator to reach that target without making buttons feel oversized.

    “The power of the Web is in its universality. Access by everyone regardless of disability is an essential aspect.”
    — Tim Berners‑Lee, W3C

    Tools Repository’s CSS Button Generator helps here by outputting lean, readable CSS without unnecessary resets or comments. That makes it easy to combine the snippet with helpers such as the Gradient Generator, Box Shadow Generator, or Border Radius Generator on the same site. Because these utilities all run in the browser, you keep control of your code while still working faster.

    For a quick post‑generation checklist:

    • Check color contrast with a contrast checker.

    • Test keyboard navigation and focus styles.

    • Try the button on a phone or tablet.

    • Skim the CSS for duplicate rules you already define elsewhere.

    Lõpuks: Start Designing Better Buttons Today

    A CSS button generator belongs in your daily toolkit. A visual editor replaces repetitive CSS tweaks while still giving you clean, ready‑to‑paste code. Tools Repository’s CSS Button Generator is free, private, and fast, and it sits beside helpers like the Gradient Generator, Box Shadow Generator, and Border Radius Generator. Research from Google links faster, clearer pages with lower bounce rates, and findings on customizable front end design further demonstrate that precise visual control over UI components like buttons leads to measurable improvements in interface quality and user satisfaction.

    If you are working on a new landing page, sign‑up form, or navigation bar, open the generator in a tab, try a few variants, and save the CSS that performs best. Over time, you will build a small, consistent button library that keeps projects tidy and users happy.

    Frequently Asked Questions

    Question 1: Is a CSS button generator free to use?
    Yes, Tools Repository’s CSS Button Generator is completely free to use in your browser with no hidden fees.

    Question 2: Do I need to create an account to use an online button generator tool?
    No, you use it directly in your browser, without signup or registration forms.

    Question 3: Can I use the generated CSS button code in commercial projects?
    Yes, you own the code and may use it anywhere, from client websites to personal SaaS dashboards.

    Question 4: What is the difference between a CSS3 button generator and a regular CSS button generator?
    CSS3 usually means support for modern CSS features like gradients, rounded corners, and shadows. Most current CSS button generators, including Tools Repository’s, support these features by default.

    Question 5: Can I add hover effects using a CSS button generator?
    Yes, the generator includes controls for hover colors and effects, and you can preview them live before copying the code.

    Question 6: Does the generated button code work on mobile devices?
    Yes, generated buttons work on responsive sites, and the tool itself loads well on phones. Make sure to keep padding and font size large enough for comfortable taps on touchscreens.